


XII. Le système d'E/S de Java▲
La création d'un bon système d'entrée/sortie, pour le concepteur du langage, est l'une des tâches les plus difficiles.
Cette difficulté est mise en évidence par le nombre d'approches différentes. Le défi semble être dans la couverture de toutes les éventualités. Non seulement il y a de nombreuses sources et réceptacles d'E/S avec lesquelles vous voudrez communiquer (fichiers, la console, connections réseau, etc.), mais vous voudrez converser avec elles de manières très différentes (séquentielle, accès-aléatoire, mise en mémoire tampon, binaire, caractère, par lignes, par mots, etc.).
Les concepteurs de la bibliothèque Java ont attaqué ce problème en créant de nombreuses classes. En fait, il y a tellement de classes pour le système d'E/S de Java que cela peut être intimidant au premier abord (ironiquement, la conception d'E/S de Java évite maintenant une explosion de classes). Il y a eu aussi un changement significatif dans la bibliothèque d'E/S après Java 1.0, quand la bibliothèque orientée-byte d'origine a été complétée par des classes d'E/S de base Unicode orientées-char. Dans le JDK 1.4, la classe nio (pour « new I/O », sigle utilisé depuis des années) a été ajoutée pour améliorer les performances et les fonctionnalités. La conséquence étant qu'il vous faudra assimiler un bon nombre de classes avant de comprendre suffisamment la représentation de l'E/S Java afin de l'employer correctement. De plus, il est plutôt important de comprendre l'évolution historique de la bibliothèque E/S, même si votre première réaction est « me prenez pas la tête avec l'historique, montrez-moi seulement comment l'utiliser ! ». Le problème est que sans un point de vue historique vous serez rapidement perdu avec certaines des classes et lorsque vous devrez les utiliser vous ne pourrez pas et ne les utiliserez pas.
Ce chapitre vous fournira une introduction aux diverses classes d'E/S que comprend la bibliothèque standard de Java et la manière de les employer.
XII-A. La classe File▲
Avant d'aborder les classes qui effectivement lisent et écrivent des données depuis des streams (flux), nous allons observer un utilitaire fourni avec la bibliothèque afin de vous assister lors des traitements de répertoire de fichiers.
La classe File possède un nom décevant - vous pouvez penser qu'elle se réfère à un fichier, mais pas du tout. Elle peut représenter soit le nom d'un fichier particulier soit les noms d'un jeu de fichiers dans un dossier. S'il s'agit d'un jeu de fichiers, vous pouvez faire appel à ce jeu avec la méthode list( ), et celle-ci renverra un tableau de String. Il est de bon sens de renvoyer un tableau plutôt qu'une classe containeur plus flexible parce que le nombre d'éléments est fixé, et si vous désirez le listing d'un répertoire différent vous créez simplement un autre objet File. En fait, « CheminDeFichier ou FilePath » aurait été un meilleur nom pour cette classe. Cette partie montre un exemple d'utilisation de cette classe, incluant l'interface associée FilenameFilter.
XII-A-1. Lister un répertoire▲
Supposons que vous désirez voir le listing d'un répertoire. L'objet File peut être listé de deux manières. Si vous appelez list( ) sans arguments, vous obtiendrez la liste complète du contenu de l'objet File. Pourtant, si vous désirez une liste restreinte - par exemple, si vous voulez tous les fichiers avec une extension .java - à ce moment-là, vous utiliserez un « filtre de répertoire », qui est une classe montrant de quelle manière sélectionner les objets File pour la visualisation.
Voici le code de l'exemple. Notez que le résultat a été trié sans effort (par ordre alphabétique) en utilisant la méthode java.utils.Arrays.sort( ) et l'AlphabeticComparator défini au Chapitre 11 :
//: c12:DirList.java
// Affiche le listing d'un répertoire via des expressions régulières.
// {Args: "D.*\.java"}
import java.io.*;
import java.util.*;
import java.util.regex.*;
import com.bruceeckel.util.*;

public class DirList {
    public static void main(String[] args) {
        File path = new File(".");
        String[] list;
        if(args.length == 0)
            list = path.list();
        else
            list = path.list(new DirFilter(args[0]));
        Arrays.sort(list, new AlphabeticComparator());
        for(int i = 0; i < list.length; i++)
            System.out.println(list[i]);
    }
}

class DirFilter implements FilenameFilter {
    private Pattern pattern;
    public DirFilter(String regex) {
        pattern = Pattern.compile(regex);
    }
    public boolean accept(File dir, String name) {
        // Information du chemin de répertoire, recherche par expression régulière
        return pattern.matcher(
            new File(name).getName()).matches();
    }
} ///:~
La classe DirFilter « implémente » l'interface FilenameFilter. Il est utile de signaler la simplicité de l'interface FilenameFilter :
public interface FilenameFilter {
    boolean accept(File dir, String name);
}
Cela veut dire que ce type d'objet ne s'occupe que de fournir une méthode appelée accept( ). La finalité derrière la création de cette classe est de fournir la méthode accept( ) à la méthode list( ) de telle manière que list( ) puisse « rappeler » accept( ) pour déterminer quels noms de fichier doivent être inclus dans la liste. Ce principe est souvent désigné par callback (ou « rappel automatique »). Plus spécifiquement, c'est un exemple de la Strategy Pattern (ou stratégie basée sur la « forme »), car list( ) implémente des fonctionnalités de base, et vous fournissez la stratégie basée sur la forme d'un FilenameFilter pour finaliser l'algorithme nécessaire en final à list( ) pour fournir le service. Parce que list( ) prend un objet FilenameFilter comme argument, cela veut dire que l'on peut passer un objet de n'importe quelle classe implémentant FilenameFilter afin de choisir (même lors de l'exécution) comment la méthode list( ) devra se comporter. L'objectif d'un rappel est de fournir une flexibilité dans le comportement du code.
DirFilter montre que comme une interface ne peut contenir qu'un jeu de méthodes, vous n'êtes pas réduit à l'écriture seule de ces méthodes. (Vous devez au moins fournir les définitions pour toutes les méthodes dans une interface, de toutes les manières.) Dans ce cas, le constructeur de DirFilter est aussi créé.
La méthode accept( ) doit accepter un objet File représentant le répertoire où se trouve un fichier en particulier , et un String contenant le nom de ce fichier. Vous pouvez choisir d'utiliser ou ignorer l'un ou l'autre de ces arguments, mais vous utiliserez probablement au moins le nom du fichier. Rappelez vous que la méthode list( ) fait appel à accept( ) pour chacun des noms de fichier de l'objet répertoire pour voir lequel doit être inclus - ceci est indiqué par le résultat booléen renvoyé par accept( ).
Pour être sûr que l'élément avec lequel vous êtes en train de travailler est seulement le nom du fichier et qu'il ne contient pas d'information de chemin, tout ce que vous avez à faire est de prendre l'objet String et de créer un objet File en dehors de celui-ci, puis d'appeler getName( ), qui éloigne toutes les informations de chemin (dans l'optique d'une indépendance vis-à-vis de la plate-forme). Puis accept( ) utilise un objet de type « expression régulière » adéquat pour voir si l'expression régulière regex correspond au nom du fichier. En utilisant accept( ), la méthode list( ) retourne un tableau.
XII-A-1-a. Les classes internes anonymes▲
Cet exemple est idéal pour une réécriture utilisant une classe interne anonyme (décrite au Chapitre 8). Tout d'abord, une méthode filter( ) est créée retournant une référence à un FilenameFilter :
//: c12:DirList2.java
// Utilisation de classes internes anonymes.
// {Args: "D.*\.java"}
import java.io.*;
import java.util.*;
import java.util.regex.*;
import com.bruceeckel.util.*;

public class DirList2 {
    public static FilenameFilter filter(final String regex) {
        // Creation de la classe anonyme interne :
        return new FilenameFilter() {
            private Pattern pattern = Pattern.compile(regex);
            public boolean accept(File dir, String name) {
                return pattern.matcher(
                    new File(name).getName()).matches();
            }
        }; // Fin de la classe anonyme interne.
    }
    public static void main(String[] args) {
        File path = new File(".");
        String[] list;
        if(args.length == 0)
            list = path.list();
        else
            list = path.list(filter(args[0]));
        Arrays.sort(list, new AlphabeticComparator());
        for(int i = 0; i < list.length; i++)
            System.out.println(list[i]);
    }
} ///:~
Notez que l'argument de filter( ) doit être final. Ceci est requis par la classe interne anonyme pour qu'elle puisse utiliser un objet hors de sa portée.
Cette conception est une amélioration puisque la classe FilenameFilter est maintenant fortement liée à DirList2. Cependant, vous pouvez reprendre cette approche et aller plus loin en définissant la classe anonyme interne comme un argument de list( ), auquel cas cela devient encore plus léger :
//: c12:DirList3.java
// Construction de la classe anonyme interne « sur-place ».
// {Args: "D.*\.java"}
import java.io.*;
import java.util.*;
import java.util.regex.*;
import com.bruceeckel.util.*;

public class DirList3 {
    public static void main(final String[] args) {
        File path = new File(".");
        String[] list;
        if(args.length == 0)
            list = path.list();
        else
            list = path.list(new FilenameFilter() {
                private Pattern pattern = Pattern.compile(args[0]);
                public boolean accept(File dir, String name) {
                    return pattern.matcher(
                        new File(name).getName()).matches();
                }
            });
        Arrays.sort(list, new AlphabeticComparator());
        for(int i = 0; i < list.length; i++)
            System.out.println(list[i]);
    }
} ///:~
L'argument de main( ) est maintenant final, puisque la classe anonyme interne utilise directement args[0].
Ceci vous montre comment les classes anonymes internes permettent la création de classes rapides-et-propres pour résoudre des problèmes. Un avantage étant que cela garde le code permettant de résoudre un problème particulier isolé dans un même lieu. D'un autre côté, cela n'est pas toujours facile à lire, donc vous devrez l'utiliser judicieusement.
XII-A-2. Vérification et création de répertoires▲
La classe File est bien plus qu'une représentation d'un fichier ou d'un répertoire existant. Vous pouvez aussi utiliser un objet File pour créer un nouveau répertoire ou un chemin complet de répertoire s'ils n'existent pas. Vous pouvez également regarder les caractéristiques des fichiers (taille, dernière modification, date, lecture/écriture), voir si un objet File représente un fichier ou un répertoire, et supprimer un fichier. Ce programme montre quelques-unes des méthodes disponibles avec la classe File (voir la documentation HTML à java.sun.com pour le jeu complet) :
//: c12:MakeDirectories.java
// Démonstration de l'usage de la classe File pour
// créer des répertoires et manipuler des fichiers.
// {Args: MakeDirectoriesTest}
import com.bruceeckel.simpletest.*;
import java.io.*;

public class MakeDirectories {
    private static Test monitor = new Test();
    private static void usage() {
        System.err.println(
            "Usage:MakeDirectories path1 ...\n" +
            "Creates each path\n" +
            "Usage:MakeDirectories -d path1 ...\n" +
            "Deletes each path\n" +
            "Usage:MakeDirectories -r path1 path2\n" +
            "Renames from path1 to path2");
        System.exit(1);
    }
    private static void fileData(File f) {
        System.out.println(
            "Absolute path: " + f.getAbsolutePath() +
            "\n Can read: " + f.canRead() +
            "\n Can write: " + f.canWrite() +
            "\n getName: " + f.getName() +
            "\n getParent: " + f.getParent() +
            "\n getPath: " + f.getPath() +
            "\n length: " + f.length() +
            "\n lastModified: " + f.lastModified());
        if(f.isFile())
            System.out.println("It's a file");
        else if(f.isDirectory())
            System.out.println("It's a directory");
    }
    public static void main(String[] args) {
        if(args.length < 1) usage();
        if(args[0].equals("-r")) {
            if(args.length != 3) usage();
            File
                old = new File(args[1]),
                rname = new File(args[2]);
            old.renameTo(rname);
            fileData(old);
            fileData(rname);
            return; // Sortie de main
        }
        int count = 0;
        boolean del = false;
        if(args[0].equals("-d")) {
            count++;
            del = true;
        }
        count--;
        while(++count < args.length) {
            File f = new File(args[count]);
            if(f.exists()) {
                System.out.println(f + " exists");
                if(del) {
                    System.out.println("deleting..." + f);
                    f.delete();
                }
            }
            else { // N'existe pas
                if(!del) {
                    f.mkdirs();
                    System.out.println("created " + f);
                }
            }
            fileData(f);
        }
        if(args.length == 1 &&
                args[0].equals("MakeDirectoriesTest"))
            monitor.expect(new String[] {
                "%% (MakeDirectoriesTest exists"+
                  "|created MakeDirectoriesTest)",
                "%% Absolute path: "
                  + "\\S+MakeDirectoriesTest",
                "%%  Can read: (true|false)",
                "%%  Can write: (true|false)",
                " getName: MakeDirectoriesTest",
                " getParent: null",
                " getPath: MakeDirectoriesTest",
                "%%  length: \\d+",
                "%%  lastModified: \\d+",
                "It's a directory"
            });
    }
} ///:~
Dans fileData( ) vous pourrez voir diverses méthodes d'investigation de fichier employées pour afficher les informations sur le fichier ou sur le chemin du répertoire.
La première méthode pratiquée par main( ) est renameTo( ), laquelle vous permet de renommer (ou déplacer) un fichier vers un nouveau chemin de répertoire signalé par l'argument, qui est un autre objet File. Ceci fonctionne également avec des répertoires de n'importe quelle longueur.
Si vous expérimentez le programme ci-dessus, vous découvrirez que vous pouvez créer un chemin de répertoire de n'importe quelle complexité puisque mkdirs( ) s'occupera de tout.
XII-B. Entrée et sortie▲
Les bibliothèques d'E/S utilisent souvent l'abstraction d'un flux [stream], qui représente n'importe quelle source ou réceptacle de données comme un objet capable de produire et de recevoir des parties de données. Le flux cache les détails de ce qui arrive aux données dans le véritable dispositif d'E/S.
Les classes de la bibliothèque d'E/S Java sont divisées par entrée et sortie, comme vous pouvez le voir en regardant la hiérarchie des classes dans la documentation du JDK. Par héritage, toute dérivée des classes InputStream ou Reader possède des méthodes de base nommées read( ) pour lire un simple byte ou un tableau de bytes. De la même manière, toutes les dérivés des classes OutputStream ou Writer ont des méthodes basiques appelées write( ) pour écrire un seul byte ou un tableau de bytes. Cependant, de manière générale vous n'utiliserez pas ces méthodes ; elles existent afin que les autres classes puissent les utiliser - ces autres classes ayant des interfaces plus utiles. Ainsi, vous créerez rarement votre objet flux [stream] par l'emploi d'une seule classe, mais au lieu de cela en plaçant les objets ensembles sur plusieurs couches pour arriver à la fonctionnalité désirée. Le fait de créer plus d'un objet pour aboutir à un seul flux est la raison primaire qui rend la bibliothèque de flux Java confuse.
Il est utile de ranger les classes suivant leurs fonctionnalités. Pour Java 1.0, les auteurs de la bibliothèque commencèrent par décider que toutes les classes n'ayant rien à voir avec l'entrée hériteraient de l'InputStream et toutes les classes qui seraient associées avec la sortie seraient héritées depuis OutputStream.
XII-B-1. Les types d'InputStream▲
Le boulot d'InputStream est de représenter les classes qui produisent l'entrée depuis différentes sources. Ces sources peuvent être :
- un tableau de bytes :
- un objet String :
- un fichier :
- un « tuyau », lequel fonctionne comme un vrai tuyau : vous introduisez des choses à une entrée et elles ressortent de l'autre :
- une succession d'autres flux, que vous pouvez ainsi rassembler dans un seul flux :
- D'autres sources, comme une connexion Internet. (Ceci sera abordé dans Thinking in Enterprise Java.)
Chacun d'entre eux possède une sous-classe associée d'InputStream. En plus, le FilterInputStream est aussi un type d'InputStream, fournissant une classe de base pour les classes de « décoration » lesquelles attachent des attributs ou des interfaces utiles aux flux d'entrée. Ceci est abordé plus tard.
Table 12-1. Types of InputStream
|
Classe |
Fonction |
Arguments du constructeur |
|---|---|---|
|
ByteArray-InputStream |
Permet d'utiliser un tampon en mémoire comme un InputStream. |
Le tampon duquel on extrait les bytes. |
|
StringBuffer-InputStream |
Convertit un String en un InputStream. |
Un String. L'implémentation sous-jacente utilise actuellement un StringBuffer. |
|
File-InputStream |
Pour lire des données depuis un fichier. |
Un String représentant le nom du fichier, ou un objet File ou FileDescriptor. |
|
Piped-InputStream |
Produit les données qui sont en train d'être écrites vers PipedOutput-Stream. Implémente le concept de « tuyauterie » (« pipe »). |
PipedOutputStream |
|
Sequence-InputStream |
Convertit deux, voire plusieurs objets InputStream en un seul InputStream. |
Deux objets InputStream ou une Enumeration pour un récipient d'objets de type InputStream |
|
Filter-InputStream |
Classe abstraite qui est une interface pour des décorateurs lesquels fournissent des fonctionnalités utiles aux autres classes InputStream. Voir Tableau 12-3. |
Voir Tableau 12-3. |
XII-B-2. Les types d'OutputStream▲
Cette catégorie contient les classes qui décident de l'endroit où iront vos données de sorties : un tableau de bytes (pas de String, cependant ; vraisemblablement vous pouvez en créer un en utilisant le tableau de bytes), un fichier, ou un « tuyau.»
En complément, le FilterOutputStream fournit une classe de base pour les classes de « décoration » qui attachent des attributs ou des interfaces utiles aux flux de sortie. Ceci sera évoqué ultérieurement.
Tableau 12-2. Les types d'OutputStream
|
Classe |
Fonction |
Arguments du constructeur |
|---|---|---|
|
ByteArray-OutputStream |
Crée un tampon en mémoire. Toutes les données que vous envoyez vers le flux sont placées dans ce tampon. |
En option la taille initiale du tampon. |
|
File-OutputStream |
Pour envoyer les informations à un fichier. |
Un String représentant le nom d'un fichier, ou un objet File ou FileDescriptor. |
|
Piped-OutputStream |
N'importe quelle information que vous écrivez vers celui-ci se termine automatiquement comme une entrée du PipedInput-Stream associé. Applique le concept de « tuyauterie. » |
PipedInputStream |
|
Filter-OutputStream |
Classe abstraite qui est une interface pour les décorateurs qui fournissent des fonctionnalités pratiques aux autres classes d'OutputStream. Voir Tableau 12-4. |
Voir Tableau 12-4. |
XII-C. Ajouter des attributs et des interfaces utiles▲
L'emploi d'objets en couches pour ajouter dynamiquement et de manière claire des responsabilités aux objets individuels est mentionné comme un Pattern de Décoration. (Patterns (61) sont le sujet de Thinking in Patterns (with Java), téléchargeable à www.BruceEckel.com). Le Pattern « décorateur » précise que tous les objets qui entourent votre objet initial possèdent la même interface. Ceci rend l'usage basique des décorateurs clair - vous envoyez le même message à un objet qu'il soit décoré ou non. C'est la raison de l'existence des classes « filter » dans la bibliothèque E/S de Java : la classe abstraite « filter » est la classe de base pour tous les décorateurs. (Un décorateur doit avoir la même interface que l'objet qu'il décore, mais le décorateur peut aussi étendre l'interface, ce qui se produit dans un certain nombre de classes « filter »).
Les décorateurs sont souvent employés quand un simple sous-classement touche un grand nombre de sous-classes pour satisfaire toutes les combinaisons possibles nécessaires - avec tellement de sous-classes que cela devient peu pratique. La bibliothèque d'E/S Java demande différentes combinaisons de caractéristiques, c'est pourquoi le Pattern de décoration est employé. (62) Il y a malgré tout un désavantage au Pattern de décoration. Les décorateurs vous donnent une plus grande flexibilité pendant l'écriture d'un programme (puisque vous pouvez facilement mélanger et assembler des attributs [attributes]), mais ils ajoutent de la complexité à votre code. La raison pour laquelle la bibliothèque d'E/S de Java n'est pas pratique d'emploi est que vous devez créer beaucoup de classes - le type « noyau » d'E/S plus tous les décorateurs - afin d'obtenir le simple objet E/S désiré.
Les classes qui procurent l'interface de décoration pour contrôler un InputStream ou OutputStream particulier sont FilterInputStream et FilterOutputStream, lesquelles n'ont pas des noms très intuitifs. FilterInputStream et FilterOutputStream sont dérivées depuis les classes de base de la bibliothèque d'E/S, InputStream et OutputStream, ceci étant l'exigence clef du décorateur (afin qu'il procure une interface commune à tous les objets qui seront décorés).
XII-C-1. Lire depuis un InputStreamavec FilterInputStream▲
La classe FilterInputStream accomplit deux choses considérablement différentes. DataInputStream vous permet de lire différents types de données primitives tout aussi bien que des objets String. (Toutes les méthodes commencent avec « read, » comme readByte( ), readFloat( ), etc.) Ceci, accompagné par DataOutputStream, vous permet de déplacer des données primitives d'une place à une autre en passant par un flux. Ces « places » sont déterminées par les classes du Tableau 12-1.
Les classes restantes modifient le comportement interne d'un InputStream : s'il est mis en tampon ou pas, s'il garde trace des lignes qu'il lit (vous permettant de demander des numéros de ligne ou de régler le numéro de ligne), et si vous pouvez pousser en arrière un caractère seul. Les deux dernières classes ressemblent beaucoup à une ressource pour construire un compilateur (c'est-à-dire, elles ont été ajoutées en support pour la construction du compilateur Java), donc vous ne l'utiliserez probablement pas en programmation habituelle.
Vous devrez probablement presque tout le temps mettre en tampon votre entrée, sans prendre en compte l'élément d'E/S auquel vous vous connectez, ainsi il aurait été plus censé pour la bibliothèque d'E/S de faire un cas spécial (ou un simple appel de méthode) pour l'entrée non mise en tampon plutôt que pour l'entrée mise en tampon.
Tableau 12-3. Les types de FilterInputStream
|
Classe |
Fonction |
Arguments du constructeur |
|---|---|---|
|
Data-InputStream |
Employé de concert avec DataOutputStream, afin de lire des primitives (int, char, long, etc.) depuis un flux de manière portable. |
InputStream |
|
Buffered-InputStream |
Utilisez ceci pour empêcher une lecture physique chaque fois que vous désirez plus de données. Cela dit « Utiliser un tampon. » |
InputStream, avec en option la taille du tampon. |
|
LineNumber-InputStream |
Garde trace des numéros de ligne dans le flux d'entrée; vous pouvez appeler getLineNumber( ) et setLineNumber( |
InputStream |
|
Pushback-InputStream |
Possède un tampon qui repousse d'un octet, il permet de pousser le dernier caractère lu en arrière. |
InputStream |
XII-C-2. Écrire vers un OutputStreamavecFilterOutputStream▲
Le complément à DataInputStream est DataOutputStream, lequel formate chacun des types de primitive et objets String vers un flux de telle sorte que n'importe quel DataInputStream, sur n'importe quelle machine, puisse le lire. Toutes les méthodes commencent par « write », comme writeByte( ), writeFloat( ), etc.
À l'origine, l'objectif de PrintStream est d'imprimer tous les types de données primitive et objets String dans un format perceptible. Ce qui est différent de DataOutputStream, dont le but est de placer les éléments de données dans un flux de manière que DataInputStream puisse de façon portable les reconstruire.
Les deux méthodes importantes dans un PrintStream sont print( ) et println( ), qui sont surchargées [overloaded] pour imprimer tous les types différents. La différence entre print( ) et println( ) est que le dernier ajoute une nouvelle ligne une fois exécuté.
PrintStream peut être problématique, car il piège toutes les IOExceptions (vous devrez tester explicitement le statut de l'erreur avec checkError( ), lequel retourne true si une erreur s'est produite). Aussi, PrintStream n'effectue pas l'internationalisation proprement et ne traite pas les sauts de ligne de manière indépendante de la plate-forme (ces problèmes sont résolus avec PrintWriter, décrit plus loin).
BufferedOutputStream est un modificateur, il dit au flux d'employer le tampon afin de ne pas avoir une écriture physique chaque fois que l'on écrit vers le flux. Cela sera probablement employé pour chaque réalisation d'une sortie.
Table 12-4. Les types de FilterOutputStream
|
Classe |
Fonction |
Arguments du Constructeur |
|---|---|---|
|
Data-OutputStream |
Utilisé en concert avec DataInputStream afin d'écrire des primitives (int, char, long, etc.) vers un flux de manière portable. |
OutputStream |
|
PrintStream |
Pour produire une sortie formatée. Pendant que DataOutputStream manie le stockage de données, le PrintStream manie l'affichage. |
OutputStream, avec un boolean optionnel indiquant que le tampon est vidé avec chaque nouvelle ligne. |
|
Buffered-OutputStream |
Utilisez ceci en prévention d'une écriture physique à chaque fois que vous envoyez un morceau de donnée. En disant « Utilise un tampon. » Vous pouvez appeler flush( ) pour vider le tampon. |
OutputStream, avec en option la taille du tampon. |
XII-D. Lecteurs & écrivains [ Readers & Writers ]▲
Java 1.1 apporte quelques modifications significatives à la bibliothèque fondamentale de flux d'E/S. Quand vous voyez les classes Reader et Writer votre première pensée (comme la mienne) doit être que celles-ci ont pour intention de remplacer les classes InputStream et OutputStream. Mais ce n'est pas le cas. Quoique certains aspects de la bibliothèque originale de flux sont dépréciés (si vous les employez vous recevrez un avertissement de la part du compilateur), les classes InputStream et OutputStream fournissent pourtant de précieuses fonctions dans le sens d'E/S orienté byte, tandis que les classes Reader et Writer fournissent des E/S à base de caractères se pliant à l'Unicode. En plus :
- Java 1.1 a ajouté de nouvelles classes dans la hiérarchie d'InputStream et d'OutputStream, donc il est évident qu'elles ne sont pas remplacées.
- Il y a des fois où vous devrez employer les classes de la hiérarchie « byte » en combinaison avec les classes de la hiérarchie « caractère ». Pour cela il y a des classes « passerelles » : InputStreamReader convertit un InputStream en un Reader et OutputStreamWriter convertit un OutputStream en un Writer.
La raison la plus importante des hiérarchies de Reader et Writer est l'internationalisation. L'ancienne hiérarchie de flux d'E/S ne supporte que des flux de bytes sur 8 bits et ne traite pas bien les caractères Unicode sur 16 bits. Depuis qu'Unicode est employé pour l'internationalisation (et les char natifs de Java sont en Unicode sur 16 bits), les hiérarchies de Reader et Writer ont été ajoutées pour supporter l'Unicode dans toutes les opérations d'E/S. En plus, les nouvelles bibliothèques sont conçues pour des opérations plus rapides que l'ancienne.
Comme il est de coutume dans ce livre, j'aurais aimé fournir une synthèse des classes, mais j'ai supposé que vous utiliserez la documentation du JDK pour éclaircir les détails, comme pour la liste exhaustive des méthodes.
XII-D-1. Les sources et les réceptacles de données▲
Presque toutes les classes originales de flux d'E/S Java possèdent des classes Reader et Writer correspondantes afin de fournir une manipulation native en Unicode. Cependant, il y a certains endroits où les InputStreams et les OutputStreams orientés-byte sont la solution adoptée ; en particulier, les bibliothèques java.util.zip sont orientées-byte plutôt qu'orientée-char. Donc l'approche la plus sage est d'essayer d'utiliser les classes Reader et Writer chaque fois que c'est possible, et vous découvrirez des situations où il vous faudra employer les bibliothèques orientées-byte parce que votre code ne se compilera pas.
Voici un tableau qui montre la correspondance entre les sources et les réceptacles de données (c'est-à-dire, d'où proviennent physiquement les données et où elles sont destinées) dans les deux hiérarchies.
|
Sources & réceptacles:
|
Correspondance classes Java 1.1 |
|---|---|
|
InputStream |
Reader |
|
OutputStream |
Writer |
|
FileInputStream |
FileReader |
|
FileOutputStream |
FileWriter |
|
StringBufferInputStream |
StringReader |
|
(pas de classe correspondante) |
StringWriter |
|
ByteArrayInputStream |
CharArrayReader |
|
ByteArrayOutputStream |
CharArrayWriter |
|
PipedInputStream |
PipedReader |
|
PipedOutputStream |
PipedWriter |
En général, vous constaterez que les interfaces des deux différentes hiérarchies sont similaires si ce n'est identiques.
XII-D-2. Modifier le comportement du flux▲
Pour les InputStreams et OutputStreams, les flux sont adaptés à des usages particuliers en utilisant des sous-classes « décoratives » de FilterInputStream et FilterOutputStream. La hiérarchie de classe Reader et Writer poursuit l'usage de ce concept - mais pas exactement.
Dans le tableau suivant, la correspondance est une approximation plus grossière que dans la table précédente. La différence est engendrée par l'organisation de la classe : Quand BufferedOutputStream est une sous-classe de FilterOutputStream, BufferedWriter n'est pas une sous-classe de FilterWriter (laquelle, bien qu'elle soit abstract, n'a pas de sous-classe et donc semble avoir été mise dedans de manière à réserver la place ou simplement de manière à ce que vous ne sachiez pas où elle se trouve). Cependant, les interfaces pour les classes sont plutôt un combat terminé.
|
Filtres:
|
Classes correspondantes Java 1.1 |
|---|---|
|
FilterInputStream |
FilterReader |
|
FilterOutputStream |
FilterWriter (classe abstraite avec aucune sous-classe) |
|
BufferedInputStream |
BufferedReader |
|
BufferedOutputStream |
BufferedWriter |
|
DataInputStream |
Utilise DataInputStream |
|
PrintStream |
PrintWriter |
|
LineNumberInputStream |
LineNumberReader |
|
StreamTokenizer |
StreamTokenizer |
|
PushBackInputStream |
PushBackReader |
Il y a un sens qui est tout à fait clair : Chaque fois que vous voulez utiliser readLine( ), vous ne devrez plus le faire avec un DataInputStream (ceci recevant un message de dépréciation au moment de la compilation), mais utiliser à la place un BufferedReader. À part cela, DataInputStream est pourtant l'élément « préféré » de la bibliothèque d'E/S.
Pour faire la transition vers l'emploi facile d'un PrintWriter, il possède des constructeurs qui prennent n'importe quel objet OutputStream, aussi bien que des objets Writer. Cependant, PrintWriter n'a pas plus de support pour formater comme le faisait PrintStream ; les interfaces sont de fait les mêmes.
Le constructeur de PrintWriter possède également une option pour effectuer le vidage automatique de la mémoire [automatic flushing], lequel se produit après chaque println( ) si le drapeau du constructeur est levé dans ce sens.
XII-D-3. Les classes inchangées▲
Certaines classes ont été laissées inchangées entre Java 1.0 et Java 1.1 :
|
Les classes de Java 1.0 qui n'ont pas de classes correspondantes en Java 1.1 |
|---|
|
DataOutputStream |
|
File |
|
RandomAccessFile |
|
SequenceInputStream |
DataOutputStream, en particulier, est utilisée sans modification, donc pour stocker et retrouver des données dans un format transportable vous utiliserez les hiérarchies InputStream et OutputStream.
XII-E. Et bien sûr : L'accès aléatoire aux fichiers (RandomAccessFile)▲
RandomAccessFile est employé pour les fichiers dont la taille de l'enregistrement est connue, de sorte que vous pouvez bouger d'un enregistrement à un autre en utilisant seek( ), puis lire ou changer les enregistrements. Les enregistrements n'ont pas forcément la même taille ; vous devez seulement être capable de déterminer de quelle grandeur ils sont et où ils sont placés dans le fichier.
D'abord il est un peu difficile de croire que RandomAccessFile ne fait pas partie de la hiérarchie d'InputStream ou d'OutputStream. Cependant, il n'y a pas d'association avec ces hiérarchies autre que quand il arrive de mettre en œuvre les interfaces DataInput et DataOutput (qui sont également mises en œuvre par DataInputStream et DataOutputStream). Elle n'utilise même pas la fonctionnalité des classes existantes InputStream ou OutputStream ; il s'agit d'une classe complètement différente, écrite en partant de zéro, avec toutes ses propres méthodes (pour la plupart native). Une raison à cela pouvant être que RandomAccessFile a des comportements essentiellement différents des autres types d'E/S, dès qu'il est possible de se déplacer en avant et en arrière dans un fichier. De toute façon, elle reste seule, comme un descendant direct d'Object.
Essentiellement, un RandomAccessFile fonctionne comme un DataInputStream collé ensemble avec un DataOutputStream, avec les méthodes getFilePointer( ) pour trouver où on se trouve dans le fichier, seek( ) pour se déplacer vers un nouvel emplacement dans le fichier, et length( ) pour déterminer la taille maximum du fichier. En complément, les constructeurs requièrent un deuxième argument (identique à fopen( ) en C) indiquant si vous effectuez de manière aléatoire une lecture (« r ») ou une lecture et écriture (« rw »). Il n'y a pas de ressource pour les fichiers en lecture seule, ce qui pourrait suggérer que RandomAccessFile aurait mieux fonctionné s'il se trouvait hérité de DataInputStream.
Les méthodes de recherche sont valables seulement dans RandomAccessFile, qui fonctionne seulement avec des fichiers. Le BufferedInputStream permet de marquer (mark( )) une position (dont la valeur est tenue dans une seule variable interne) et d'annuler cette position (reset( )), mais c'est limité et pas très pratique.
La plupart, si ce n'est tout, de la fonctionnalité RandomAccessFile est remplacée dans le JDK 1.4 avec le système de fichiers mappés en mémoire (nio memory-mapped files), qui sera décrit ultérieurement dans ce chapitre.
XII-F. L'usage typique des flux d'E/S▲
Bien que l'on puisse combiner les classes de flux d'E/S de différentes manières, on utilise souvent un petit nombre de combinaisons. L'exemple suivant pourra être employé comme une référence de base ; il montre la création et l'utilisation de configurations d'E/S typiques. Notez que chaque configuration commence par un commentaire avec numéro et titre qui correspondent aux titres des paragraphes fournissant ensuite l'explication appropriée.
//: c12:IOStreamDemo.java
// Configurations typiques de flux d'E/S.
// {Lancer à la main}
// {Nettoyer: IODemo.out,Data.txt,rtest.dat}
import com.bruceeckel.simpletest.*;
import java.io.*;

public class IOStreamDemo {
    private static Test monitor = new Test();
    // Lance les exceptions vers la console :
    public static void main(String[] args)
    throws IOException {
        // 1. Lecture d'entrée par lignes:
        BufferedReader in = new BufferedReader(
            new FileReader("IOStreamDemo.java"));
        String s, s2 = new String();
        while((s = in.readLine())!= null)
            s2 += s + "\n";
        in.close();

        // 1b. Lecture d'entrée standard:
        BufferedReader stdin = new BufferedReader(
            new InputStreamReader(System.in));
        System.out.print("Enter a line:");
        System.out.println(stdin.readLine());

        // 2. Entrée depuis la mémoire
        StringReader in2 = new StringReader(s2);
        int c;
        while((c = in2.read()) != -1)
            System.out.print((char)c);

        // 3. Entrée de mémoire formatée
        try {
            DataInputStream in3 = new DataInputStream(
                new ByteArrayInputStream(s2.getBytes()));
            while(true)
                System.out.print((char)in3.readByte());
        } catch(EOFException e) {
            System.err.println("End of stream");
        }

        // 4. Sortie de fichier
        try {
            BufferedReader in4 = new BufferedReader(
                new StringReader(s2));
            PrintWriter out1 = new PrintWriter(
                new BufferedWriter(new FileWriter("IODemo.out")));
            int lineCount = 1;
            while((s = in4.readLine()) != null )
                out1.println(lineCount++ + ": " + s);
            out1.close();
        } catch(EOFException e) {
            System.err.println("End of stream");
        }

        // 5. Stockage et récupération de données
        try {
            DataOutputStream out2 = new DataOutputStream(
                new BufferedOutputStream(
                    new FileOutputStream("Data.txt")));
            out2.writeDouble(3.14159);
            out2.writeUTF("That was pi");
            out2.writeDouble(1.41413);
            out2.writeUTF("Square root of 2");
            out2.close();
            DataInputStream in5 = new DataInputStream(
                new BufferedInputStream(
                    new FileInputStream("Data.txt")));
            // Doit utiliser DataInputStream pour des données:
            System.out.println(in5.readDouble());
            // Seul readUTF() pourra retrouver
            // la chaine (String) au format Java-UTF correctement:
            System.out.println(in5.readUTF());
            // Lit les "double" et "string" suivants:
            System.out.println(in5.readDouble());
            System.out.println(in5.readUTF());
        } catch(EOFException e) {
            throw new RuntimeException(e);
        }

        // 6. Lecture/écriture par accès aléatoire aux fichiers
        RandomAccessFile rf =
            new RandomAccessFile("rtest.dat", "rw");
        for(int i = 0; i < 10; i++)
            rf.writeDouble(i*1.414);
        rf.close();
        rf = new RandomAccessFile("rtest.dat", "rw");
        rf.seek(5*8);
        rf.writeDouble(47.0001);
        rf.close();
        rf = new RandomAccessFile("rtest.dat", "r");
        for(int i = 0; i < 10; i++)
            System.out.println("Value " + i + ": " +
                rf.readDouble());
        rf.close();
        monitor.expect("IOStreamDemo.out");
    }
} ///:~
Voici les descriptions pour les sections numérotées du programme :
XII-F-1. Flux d'Entrée▲
Les parties 1 à 4 montrent la création et l'utilisation des flux d'entrée. La partie 4 montre également l'emploi simple d'un flux de sortie.
XII-F-1-a. Entrée de fichier avec tampon [Buffered input file] (1)▲
Pour ouvrir un fichier et y écrire des caractères, on utilise un FileInputReader avec un objet String ou File comme nom de fichier. Pour gagner en vitesse, il est préférable que le fichier soit mis en mémoire tampon alors et on passera ainsi la référence résultante au constructeur BufferedReader. Puisque BufferedReader fournit aussi la méthode readLine( ), c'est de fait notre objet final et l'interface depuis laquelle on lit. Quand on atteint la fin du fichier, readLine( ) renverra un null dont on se servira pour sortir de la boucle while.
Le String s2 est utilisé pour accumuler le contenu entier du fichier (incluant les nouvelles lignes qui doivent être ajoutées puisque readLine( ) les enlève). s2 est ensuite employé dans la dernière partie de ce programme. Enfin, close( ) est appelé pour fermer le fichier. Techniquement, close( ) sera appelé au lancement de finalize( ), et ceci est supposé se produire (que le garbage collector se déclenche ou non) lors de la fermeture du programme. Cependant, ceci a été implémenté de manière inconsistante, c'est pourquoi la seule approche sûre est d'appeler explicitement close( ) pour les fichiers.
La section 1b montre comment « envelopper » System.in afin de lire l'entrée sur la console. System.in est un InputStream et BufferedReader nécessite un argument Reader, voilà pourquoi InputStreamReader est utilisé pour effectuer la traduction.
XII-F-1-b. Entrée depuis la mémoire (2)▲
Cette partie prend le String s2 qui contient maintenant l'intégralité du contenu du fichier et l'utilise pour créer un StringReader. Puis read( ) est utilisé pour lire les caractères un par un et les envoie vers la console. Notez que read( ) renvoie le byte suivant sous la forme d'un int et pour cette raison il doit être converti en char afin de s'afficher correctement.
XII-F-1-c. Entrée de mémoire formatée (3)▲
Pour lire une donnée « formatée », vous utiliserez un DataInputStream, qui est une classe d'E/S orientée-byte (plutôt qu'orientée-char). Ainsi, vous devrez utiliser les classes InputStream plutôt que les classes Reader. Bien sûr, vous pouvez lire n'importe quoi (un fichier par exemple) comme des bytes en utilisant les classes InputStream, mais ici, c'est un String qui est utilisé. Pour convertir le String en un tableau de bytes, ce qui est approprié pour un ByteArrayInputStream, String possède une méthode getBytes( ) pour faire le travail. À ce stade, vous avez alors un InputStream adéquat à transmettre à un DataInputStream.
Si on lit les caractères depuis un DataInputStream byte par byte en utilisant readByte( ), n'importe quelle valeur de byte donne un résultat juste, donc la valeur de retour ne peut pas être employée pour détecter la fin de l'entrée. À la place, on peut employer la méthode available( ) pour découvrir combien de caractères sont encore disponibles. Voici un exemple qui montre comment lire un fichier byte par byte :
//: c12:TestEOF.java
// Test de fin de fichier en lisant un byte a la fois.
import java.io.*;

public class TestEOF {
    // Lance les exceptions vers la console:
    public static void main(String[] args)
    throws IOException {
        DataInputStream in = new DataInputStream(
            new BufferedInputStream(
                new FileInputStream("TestEOF.java")));
        while(in.available() != 0)
            System.out.print((char)in.readByte());
    }
} ///:~
Notons qu'available( ) se comporte différemment en fonction du type de ressource depuis laquelle on lit; c'est littéralement « le nombre de bytes qui peuvent être lus sans blocage. » Avec un fichier, cela signifie le fichier entier, mais avec un autre type de flux cela pourrait ne pas être vrai, alors employez-le judicieusement.
Il est aussi possible de détecter la fin d'une entrée dans ce genre de cas en gérant les exceptions. Cependant, l'utilisation des exceptions dans le contexte d'un contrôle de flux est considérée comme une mauvaise utilisation de cette fonctionnalité.
XII-F-1-d. Sortie de Fichier (4)▲
Cet exemple montre également comment écrire des données dans un fichier. Premièrement, un FileWriter est créé pour se connecter au fichier. Vous voudrez toujours mettre en tampon la sortie en la plaçant [wrapping it] dans un BufferedWriter (essayez de retirer cette enveloppe pour voir l'impact sur les performances - le tampon tend à accroître spectaculairement les performances des opérations d'E/S). Puis, pour la mise en forme, on le transforme en un PrintWriter. Le fichier de données ainsi créé est lisible comme un fichier texte normal.
Les numéros de lignes sont ajoutés au fur et à mesure de l'écriture des lignes dans le fichier. Notez que LineNumberInputStream n'est pas utilisé, parce que c'est une classe absurde et que vous n'en avez pas besoin. Comme on le montre ici, il est facile de tenir vous-même les comptes de vos numéros de lignes.
Quand le flux d'entrée est épuisé, readLine( ) renvoie null. Vous verrez un close( ) explicite pour out1, car si vous ne faites pas appel à close( ) pour tous vos fichiers de sortie, vous pourrez constater que les tampons ne sont pas vidés, et donc que vos fichiers sont incomplets.
XII-F-2. Flux de sortie▲
Les deux types de flux de sortie sont séparés par la manière dont ils écrivent les données ; un les écrit pour une utilisation humaine, l'autre les écrit pour une réacquisition par un DataInputStream. Le RandomAccessFile se tient seul, bien que son format de données soit compatible avec un DataInputStream et le DataOutputStream.
XII-F-2-a. Stocker et récupérer des données (5)▲
Un PrintWriter formate les données afin de les rendre lisibles par un humain. Cependant, pour sortir des données qui puissent être récupérées par un autre flux, on utilise un DataOutputStream pour écrire les données et un DataInputStream pour récupérer les données. Bien sûr, ces flux pourraient être n'importe quoi, mais ici c'est un fichier qui est employé, mis en mémoire tampon pour lire et écrire. DataOutputStream et DataInputStream sont orientés byte et nécessitent ainsi des InputStreams ou des OutputStreams.
Si vous employez un DataOutputStream pour écrire les données, alors Java se porte garant de l'exacte récupération des données en employant un DataInputStream - sans se soucier du type de plate-forme qui écrit et lit les données. Ce qui est incroyablement précieux, pour n'importe qui ayant passé du temps à propos des données spécifiques selon les plates-formes. Ce problème disparaît si l'on a Java sur les deux plates-formes. (63)
Lors de l'utilisation d'un DataOutputStream, l'unique manière sûre d'écrire un String pour qu'il puisse être récupéré par un DataInputStream est d'utiliser l'encodage UTF-8, comme écrit dans l'exemple de la section 5 en utilisant writeUTF( ) et readUTF( ). L'UTF-8 est une variation de l'Unicode, qui stocke chaque caractère sur deux octets (bytes). Si vous travaillez avec l'ASCII ou principalement des caractères ASCII (qui occupent seulement sept bits), c'est un énorme gâchis d'espace et/ou de bande passante, ainsi l'UTF-8 encode les caractères ASCII sur un seul octet, et les caractères non-ASCII sur deux ou trois octets. De plus, la longueur d'une chaîne est stockée dans les deux premiers octets. Cependant, writeUTF( ) et readUTF( ) utilisent une variante de l'UTF-8 pour Java (qui est décrite complètement dans la documentation du JDK pour ces méthodes), ainsi si vous lisez une chaîne écrite avec writeUTF( ) avec un programme non-Java, vous devez écrire un code spécial pour lire proprement cette chaîne.
Avec writeUTF( ) et readUTF( ), vous pouvez mélanger des Strings et d'autres types de données en utilisant un DataOutputStream en sachant que les Strings seront stockées proprement comme Unicode, et seront facilement récupérées avec un DataInputStream.
Le writeDouble( )stocke les nombres double pour le flux et le complémentaire readDouble( ) les récupère (il y a des méthodes similaires pour lire et écrire les autres types). Mais pour que n'importe quelle méthode de lecture fonctionne correctement, vous devez connaître l'emplacement exact des éléments de donnée dans le flux, puisqu'il serait possible de lire les double stockés comme de simples séquences d'octets, ou comme des char, etc. Par conséquent vous devez soit avoir un format fixe pour les données dans le fichier, ou des informations supplémentaires devront être stockées dans le fichier que vous analyserez pour déterminer l'endroit où les données sont stockées. Notez que la sérialisation (décrit plus tard dans ce chapitre) peut être une façon plus simple de stocker et de récupérer des structures de données complexes.
XII-F-2-b. Accès aléatoire en lecture et écriture aux fichiers (6)▲
Comme noté précédemment, le RandomAccessFile est presque totalement isolé du reste de la hiérarchie d'E/S, protégé par le fait qu'il implémente les interfaces DataInput et DataOutput. Par conséquent vous ne pouvez pas le combiner avec l'un des aspects des sous-classes d'InputStream et d'OutputStream. Bien qu'il pourrait sembler raisonnable de traiter un ByteArrayInputStream comme un élément d'accès aléatoire, vous pouvez employer un RandomAccessFile seulement pour ouvrir un fichier. Vous devez supposer qu'un RandomAccessFile est correctement mis en mémoire tampon puisque vous ne pouvez pas ajouter cela.
La seule option disponible est dans le second argument du constructeur : vous pouvez ouvrir un RandomAccessFile pour lire (« r ») ou lire et écrire (« rw »).
Utiliser un RandomAccessFile est comme utiliser une combinaison de DataInputStream et de DataOutputStream (parce que cela implémente les interfaces équivalentes). De plus, vous pouvez remarquer que seek( ) est utilisé pour se déplacer dans le fichier et changer une des valeurs.
Avec l'arrivée des nouvelles E/S dans le JDK 1.4, vous pourriez vouloir considérer l'utilisation des fichiers avec correspondance en mémoire (memory-mapped) plutôt que les RandomAccessFile.
XII-F-3. Flux redirigé▲
Les PipedInputStream, PipedOutputStream, PipedReader et PipedWriter sont mentionnés de manière brève dans ce chapitre. Ce qui n'insinue pas qu'ils ne sont pas utiles, mais leur importance n'est pas évidente jusqu'à ce que vous ayez commencé a comprendre le multithreading, étant donné que les flux piped sont employés pour communiquer entre les threads. Ceci est abordé avec un exemple au chapitre 13.
XII-G. Utilitaires de lecture et d'écriture de fichiers▲
Une tâche très commune en programmation est de lire un fichier en mémoire, de le modifier, et de l'écrire de nouveau. Un des problèmes avec la bibliothèque d'E/S en Java est-ce que cela nécessite assez de code pour effectuer des tâches élémentaires, il n'y a pas de fonctions basiques pour vous aider à la faire à votre place. Ce qui est même pire, avec les décorateurs il est difficile de se rappeler comment ouvrir les fichiers. Ainsi, cela a un sens d'ajouter des classes d'aide à votre bibliothèque qui exécuteront facilement ces tâches basiques. Ici en voici une qui contient des méthodes static pour lire et écrire des fichiers textes en une seule chaîne de caractères. De plus, vous pouvez créer une classe TextFile qui stocke les lignes d'un fichier dans un ArrayList (ainsi vous aurez toutes les fonctionnalités d'un ArrayList disponible pour manipuler le contenu du fichier).
//: com:bruceeckel:util:TextFile.java
// fonctions static pour lire et écrire des fichiers texte
// comme une chaine de caractères, et traiter un fichier comme
// un ArrayList
// {Clean: test.txt test2.txt}
package com.bruceeckel.util;
import java.io.*;
import java.util.*;

public class TextFile extends ArrayList {
    // Outils pour lire et écrire des fichiers
    // comme chaine de caractères
    public static String
    read(String fileName) throws IOException {
        StringBuffer sb = new StringBuffer();
        BufferedReader in =
            new BufferedReader(new FileReader(fileName));
        String s;
        while((s = in.readLine()) != null) {
            sb.append(s);
            sb.append("\n");
        }
        in.close();
        return sb.toString();
    }
    public static void
    write(String fileName, String text) throws IOException {
        PrintWriter out = new PrintWriter(
            new BufferedWriter(new FileWriter(fileName)));
        out.print(text);
        out.close();
    }
    public TextFile(String fileName) throws IOException {
        super(Arrays.asList(read(fileName).split("\n")));
    }
    public void write(String fileName) throws IOException {
        PrintWriter out = new PrintWriter(
            new BufferedWriter(new FileWriter(fileName)));
        for(int i = 0; i < size(); i++)
            out.println(get(i));
        out.close();
    }
    // test simple :
    public static void main(String[] args) throws Exception {
        String file = read("TextFile.java");
        write("test.txt", file);
        TextFile text = new TextFile("test.txt");
        text.write("test2.txt");
    }
} ///:~
Toutes les méthodes remontent simplement des IOExceptions à la méthode appelante. read( ) concatène chaque ligne à un StringBuffer (pour l'efficacité) suivi par une nouvelle ligne, parce qu'elle est supprimée pendant la lecture. Un String contenant le fichier en entier est alors renvoyé. Write( ) ouvre et écrit un texte dans le fichier. Pour ces deux méthodes, rappelez-vous d'utiliser close( ) sur ce fichier après l'exécution.
Le constructeur utilise la méthode read( ) pour transformer un fichier en String, il utilise alors String.split( ) pour diviser le résultat en lignes selon le séparateur de lignes (si vous utilisez beaucoup cette classe, vous pourriez vouloir réécrire ce constructeur afin d'améliorer l'efficacité). Hélas, il n'y a pas de méthode « join », ainsi la méthode non-static write( ) doit être écrite à la main.
Dans le main( ), un test simple est effectué pour s'assurer que les méthodes fonctionnent. Bien que ce soit une petite quantité de code, l'utiliser peut permettre d'économiser beaucoup de temps et rendre votre vie plus simple, comme vous pourrez le voir dans les exemples suivants dans ce chapitre.
XII-H. E/S Standard▲
Le terme d'E/S standard se réfère au concept d'Unix (qui est reproduit sous une certaine forme dans Windows et bien d'autres systèmes d'exploitation) d'un simple flux d'information qui est utilisé par un programme. Toutes les entrées du programme peuvent provenir d'une entrée standard, toutes ses sorties peuvent aller vers une sortie standard, et tous les messages d'erreur peuvent être envoyés à une erreur standard. L'importance de l'E/S standard est que les programmes peuvent être facilement enchainés les uns avec les autres, et la sortie standard d'un programme peut devenir l'entrée standard pour un autre programme. C'est un outil puissant.
XII-H-1. Lire depuis l'entrée standard▲
Suivant le modèle d'E/S standard, Java possède System.in, System.out, et System.err. Tout au long de ce livre vous avez vu comment écrire vers la sortie standard en utilisant System.out, qui est déjà préenveloppé comme un objet PrintStream. System.err est semblable à un PrintStream, mais System.in est un InputStream brut sans enveloppe. Ceci signifie que bien que vous pouvez utiliser System.out et System.err directement, System.in doit être enveloppé avant de pouvoir y lire depuis.
Généralement, vous désirez lire de l'entrée une ligne à la fois en utilisant readLine( ), donc vous devrez envelopper System.in dans un BufferedReader. Pour cela, vous devrez convertir System.in en Reader en utilisant un InputStreamReader. Voici un exemple qui fait simplement écho de chaque ligne tapée :
//: c12:Echo.java
// Comment lire depuis l'entrée standard.
// {RunByHand}
import java.io.*;

public class Echo {
    public static void main(String[] args)
    throws IOException {
        BufferedReader in = new BufferedReader(
            new InputStreamReader(System.in));
        String s;
        while((s = in.readLine()) != null && s.length() != 0)
            System.out.println(s);
        // Une ligne vide ou Ctrl-Z met fin au programme.
    }
} ///:~
Le sens de l'instruction d'exception est que readLine( ) peut lancer une IOException. Notez que System.in pourra généralement être mis en tampon, comme avec la plupart des flux.
XII-H-2. Modifier System.out en un PrintWriter▲
System.out est un PrintStream, qui est un OutputStream. PrintWriter a un constructeur qui prend un OutputStream en argument. Ainsi, si vous le désirez vous pouvez convertir System.out en un PrintWriter en utilisant ce constructeur :
//: c12:ChangeSystemOut.java
// Transforme System.out en un PrintWriter.
import com.bruceeckel.simpletest.*;
import java.io.*;

public class ChangeSystemOut {
    private static Test monitor = new Test();
    public static void main(String[] args) {
        PrintWriter out = new PrintWriter(System.out, true);
        out.println("Hello, world");
        monitor.expect(new String[] {
            "Hello, world"
        });
    }
} ///:~
Il est important d'utiliser la version à deux arguments du constructeur PrintWriter et de fixer le deuxième argument à true afin de permettre un vidage automatique ; autrement, vous pourriez ne pas voir la sortie.
XII-H-3. Rediriger les E/S standards▲
La classe Java System vous permet de rediriger l'entrée, la sortie, et l'erreur standard des flux d'E/S en employant un simple appel aux méthodes statiques :
setIn(InputStream)
setOut(PrintStream)
setErr(PrintStream)
Rediriger la sortie est particulièrement utile si, soudainement, vous commencez à créer une grande quantité de sortie sur l'écran et qu'il défile jusqu'à la fin plus vite que vous ne pouvez le lire. (64) Rediriger l'entrée est précieux pour un programme en ligne de commande dans lequel vous désirez tester une séquence d'entrée utilisateur à plusieurs reprises. Voici un exemple simple qui montre l'utilisation de ces méthodes :
//: c12:Redirecting.java
// Démonstration des redirections d'E/S standard.
// {Clean: test.out}
import java.io.*;

public class Redirecting {
    // Lance les exceptions vers la console :
    public static void main(String[] args)
    throws IOException {
        PrintStream console = System.out;
        BufferedInputStream in = new BufferedInputStream(
            new FileInputStream("Redirecting.java"));
        PrintStream out = new PrintStream(
            new BufferedOutputStream(
                new FileOutputStream("test.out")));
        System.setIn(in);
        System.setOut(out);
        System.setErr(out);
        BufferedReader br = new BufferedReader(
            new InputStreamReader(System.in));
        String s;
        while((s = br.readLine()) != null)
            System.out.println(s);
        out.close(); // Rappelez-vous de ça !
        System.setOut(console);
    }
} ///:~
Ce programme associe la sortie standard à un fichier, et redirige la sortie standard et l'erreur standard vers un autre fichier.
La redirection d'E/S manipule les flux d'octets (bytes), mais pas les flux de caractères, ainsi InputStreams et OutputStreams sont utilisés plutôt que les Readers et les Writers.
XII-I. Nouvelles E/S▲
La « nouvelle » bibliothèque d'E/S Java, introduite avec le JDK 1.4 dans les packages java.nio.* a pour unique but la vitesse. En effet, les « anciens » packages d'E/S ont été implémentés de nouveau en utilisant nio afin de profiter de cette augmentation de vitesse, ainsi vous en bénéficierez même si vous n'écrivez pas explicitement du code avec nio. Cette augmentation de vitesse apparaît aussi bien dans les E/S fichiers, qui sont examinées ici, signet id=« signetNoteBasPage12.5 »/> (65) que les E/S réseaux, qui sont abordées dans Thinking in Enterprise Java.
Cette vitesse vient en utilisant des structures qui sont plus proches de la façon dont un système d'exploitation effectue des E/S : des canaux (channels) et des tampons (buffers). Vous pouvez y penser comme une mine de charbon ; le canal est la mine contenant la veine de charbon (les données), et le tampon est le chariot que vous envoyez dans la mine. Le chariot revient plein de charbon, et vous récupérez le charbon du chariot. De cette façon, vous n'interagissez pas directement avec le canal ; vous communiquez avec le tampon et envoyez le tampon dans le canal. Soit le canal récupère des données du tampon, soit il met des données dans le tampon.
La seule sorte de tampon qui communique directement avec le canal est un ByteBuffer, qui est un tampon qui contient des octets bruts. Si vous regardez dans la documentation du JDK pour java.nio.ByteBuffer, vous verrez qu'il est assez élémentaire : vous le créez en lui disant combien d'espace de stockage à allouer, et il y a une sélection de méthodes pour mettre et récupérer les données, soit en octet brut, soit avec des types de données primitifs. Néanmoins il n'y a aucun moyen de mettre ou de récupérer un objet, ou même un String. Il est relativement bas niveau justement pour effectuer une relation plus efficace avec la plupart des systèmes d'exploitation.
Trois des « anciennes » classes d'E/S ont été modifiées afin qu'elles retournent un FileChannel : FileInputStream, FileOutputStream, et, pour la lecture et écriture, RandomAccessFile. Les classes Reader et Writer qui gèrent les caractères ne produisent pas des canaux, mais la classe java.nio.channels.Channels possède une méthode utilitaire qui produit des Readers et des Writers à partir des canaux.
Voici un exemple simple qui montre les trois types de flux pour produire des canaux accessibles en écriture seule, en lecture/écriture ou en lecture seule :
//: c12:GetChannel.java
// Obtenir des canaux à partir des flux
// {Nettoyer: data.txt}
import java.io.*;
import java.nio.*;
import java.nio.channels.*;

public class GetChannel {
    private static final int BSIZE = 1024;
    public static void main(String[] args) throws Exception {
        // Ecrire un fichier :
        FileChannel fc =
            new FileOutputStream("data.txt").getChannel();
        fc.write(ByteBuffer.wrap("Some text ".getBytes()));
        fc.close();
        // Ajouter à la fin du fichier
        fc =
            new RandomAccessFile("data.txt", "rw").getChannel();
        fc.position(fc.size()); // Déplacer à la fin
        fc.write(ByteBuffer.wrap("Some more".getBytes()));
        fc.close();
        // Lit le fichier :
        fc = new FileInputStream("data.txt").getChannel();
        ByteBuffer buff = ByteBuffer.allocate(BSIZE);
        fc.read(buff);
        buff.flip();
        while(buff.hasRemaining())
            System.out.print((char)buff.get());
    }
} ///:~
Pour n'importe quelles classes de flux montrées ici, getChannel( ) retournera un FileChannel. Un canal est assez simple : vous pouvez lui donner un ByteBuffer pour lire et écrire, et vous pouvez verrouiller des régions du fichier pour un accès exclusif (cela sera décrit par la suite).
Une façon de mettre des octets dans un ByteBuffer est de les bourrer directement en utilisant une des méthodes « put », pour mettre un ou plusieurs octets ou des valeurs de types primitifs. Cependant, comme montré ici, vous pouvez aussi « encapsuler » un tableau de bytes dans un ByteBuffer en utilisant la méthode wrap( ). Lorsque vous faites cela, le tableau sous-jacent n'est pas copié, mais à la place est utilisé l'espace de stockage pour le ByteBuffer généré. Nous disons que le ByteBuffer est « changé par » (backed by) le tableau.
Le fichier data.txt est rouvert en utilisant un RandomAccessFile. Notez que vous pouvez déplacer le FileChannel autour du fichier : ici, il est déplacé à la fin ainsi toute écriture additionnelle sera ajoutée à la fin.
Pour la lecture seule, vous devez explicitement allouer un ByteBuffer en utilisant la méthode static allocate( ). Le but de nio est de déplacer rapidement une grande quantité de données, ainsi la taille du ByteBuffer devrait être significative. En fait, la 1K utilisée ici est probablement bien plus petite que celle que vous devrez normalement utiliser (vous devez expérimenter avec votre application en état de marche pour trouver la meilleure taille).
Il est aussi possible d'aller chercher encore plus de vitesse en utilisant allocateDirect( ) plutôt que allocate( ) pour produire un tampon « direct » qui peut être encore plus fortement couplé avec le système d'exploitation. Cependant, le coût dans une telle allocation est plus important, et l'implémentation réelle varie d'un système d'exploitation à l'autre, alors encore une fois, vous devez expérimenter avec votre application en état de marche pour découvrir si les tampons directs vous apporteront un avantage en vitesse.
Une fois que vous appelez read( ) pour dire au FileChannel de stocker les octets dans un ByteBuffer, vous devez appeler flip( ) sur le tampon pour lui dire de se tenir prêt pour obtenir ses octets extraits (oui, cela semble un peu rudimentaire, mais souvenez-vous que c'est très bas niveau et que cela est fait pour une vitesse maximale). Si vous vouliez utiliser un tampon pour d'autres opérations read( ), vous auriez aussi à appeler clear( ) pour le préparer pour chaque read( ). Vous pouvez voir cela dans un simple programme de copie de fichier :
//: c12:ChannelCopy.java
// Copier un fichier en utilisant canaux et tampons
// {Args: ChannelCopy.java test.txt}
// {Nettoyer: test.txt}
import java.io.*;
import java.nio.*;
import java.nio.channels.*;

public class ChannelCopy {
    private static final int BSIZE = 1024;
    public static void main(String[] args) throws Exception {
        if(args.length != 2) {
            System.out.println("arguments: sourcefile destfile");
            System.exit(1);
        }
        FileChannel
            in = new FileInputStream(args[0]).getChannel(),
            out = new FileOutputStream(args[1]).getChannel();
        ByteBuffer buffer = ByteBuffer.allocate(BSIZE);
        while(in.read(buffer) != -1) {
            buffer.flip(); // Préparation écriture
            out.write(buffer);
            buffer.clear();  // Préparation lecture
        }
    }
} ///:~
Vous pouvez voir qu'un FileChannel est ouvert pour la lecture, et un autre pour l'écriture. Un ByteBuffer est alloué, et quand FileChannel.read( ) retourne -1 (un rescapé, sans doute, d'Unix et de C), cela signifie que vous avez atteint la fin des données à traiter. Après chaque read( ), qui met des données dans le tampon, flip( ) prépare le tampon ainsi son information peut être extraite par le write( ). Après le write( ), l'information est encore dans le buffer, et clear( ) réinitialise tous les pointeurs internes afin d'être prêt à accepter des données provenant d'un autre read( ).
Le programme précédent n'est pas idéal pour manipuler ce type d'opérations, cependant. Les méthodes spéciales transferTo( ) et transferFrom( ) vous permettent de connecter un canal directement à un autre :
//: c12:TransferTo.java
// Utiliser transferTo() entre des canaux
// {Args: TransferTo.java TransferTo.txt}
// {Nettoyer: TransferTo.txt}
import java.io.*;
import java.nio.*;
import java.nio.channels.*;

public class TransferTo {
    public static void main(String[] args) throws Exception {
        if(args.length != 2) {
            System.out.println("arguments: sourcefile destfile");
            System.exit(1);
        }
        FileChannel
            in = new FileInputStream(args[0]).getChannel(),
            out = new FileOutputStream(args[1]).getChannel();
        in.transferTo(0, in.size(), out);
        // Or:
        // out.transferFrom(in, 0, in.size());
    }
} ///:~
Vous ne ferez pas ce genre de chose très souvent, mais il est bon de le savoir.
XII-I-1. Converting data▲
If you look back at GetChannel.java, you'll notice that, to print the information in the file, we are pulling the data out one byte at a time and casting each byte to a char. This seems a bit primitive-if you look at the java.nio.CharBuffer class, you'll see that it has a toString( ) method that says: « Returns a string containing the characters in this buffer. » Since a ByteBuffer can be viewed as a CharBuffer with the asCharBuffer( ) method, why not use that? As you can see from the first line in the expect( ) statement below, this doesn't work out:
//: c12:BufferToText.java
// Converting text to and from ByteBuffers
// {Clean: data2.txt}
import java.io.*;
import java.nio.*;
import java.nio.channels.*;
import java.nio.charset.*;
import com.bruceeckel.simpletest.*;

public class BufferToText {
    private static Test monitor = new Test();
    private static final int BSIZE = 1024;
    public static void main(String[] args) throws Exception {
        FileChannel fc =
            new FileOutputStream("data2.txt").getChannel();
        fc.write(ByteBuffer.wrap("Some text".getBytes()));
        fc.close();
        fc = new FileInputStream("data2.txt").getChannel();
        ByteBuffer buff = ByteBuffer.allocate(BSIZE);
        fc.read(buff);
        buff.flip();
        // Doesn't work:
        System.out.println(buff.asCharBuffer());
        // Decode using this system's default Charset:
        buff.rewind();
        String encoding = System.getProperty("file.encoding");
        System.out.println("Decoded using " + encoding + ": "
            + Charset.forName(encoding).decode(buff));
        // Or, we could encode with something that will print:
        fc = new FileOutputStream("data2.txt").getChannel();
        fc.write(ByteBuffer.wrap(
            "Some text".getBytes("UTF-16BE")));
        fc.close();
        // Now try reading again:
        fc = new FileInputStream("data2.txt").getChannel();
        buff.clear();
        fc.read(buff);
        buff.flip();
        System.out.println(buff.asCharBuffer());
        // Use a CharBuffer to write through:
        fc = new FileOutputStream("data2.txt").getChannel();
        buff = ByteBuffer.allocate(24); // More than needed
        buff.asCharBuffer().put("Some text");
        fc.write(buff);
        fc.close();
        // Read and display:
        fc = new FileInputStream("data2.txt").getChannel();
        buff.clear();
        fc.read(buff);
        buff.flip();
        System.out.println(buff.asCharBuffer());
        monitor.expect(new String[] {
            "????",
            "%% Decoded using [A-Za-z0-9_\\-]+: Some text",
            "Some text",
            "Some text\0\0\0"
        });
    }
} ///:~
The buffer contains plain bytes, and to turn these into characters we must either encode them as we put them in (so that they will be meaningful when they come out) or decode them as they come out of the buffer. This can be accomplished using the java.nio.charset.Charset class, which provides tools for encoding into many different types of character sets:
//: c12:AvailableCharSets.java
// Displays Charsets and aliases
import java.nio.charset.*;
import java.util.*;
import com.bruceeckel.simpletest.*;

public class AvailableCharSets {
    private static Test monitor = new Test();
    public static void main(String[] args) {
        Map charSets = Charset.availableCharsets();
        Iterator it = charSets.keySet().iterator();
        while(it.hasNext()) {
            String csName = (String)it.next();
            System.out.print(csName);
            Iterator aliases = ((Charset)charSets.get(csName))
                .aliases().iterator();
            if(aliases.hasNext())
                System.out.print(": ");
            while(aliases.hasNext()) {
                System.out.print(aliases.next());
                if(aliases.hasNext())
                    System.out.print(", ");
            }
            System.out.println();
        }
        monitor.expect(new String[] {
            "Big5: csBig5",
            "Big5-HKSCS: big5-hkscs, Big5_HKSCS, big5hkscs",
            "EUC-CN",
            "EUC-JP: eucjis, x-eucjp, csEUCPkdFmtjapanese, " +
            "eucjp, Extended_UNIX_Code_Packed_Format_for" +
            "_Japanese, x-euc-jp, euc_jp",
            "euc-jp-linux: euc_jp_linux",
            "EUC-KR: ksc5601, 5601, ksc5601_1987, ksc_5601, " +
            "ksc5601-1987, euc_kr, ks_c_5601-1987, " +
            "euckr, csEUCKR",
            "EUC-TW: cns11643, euc_tw, euctw",
            "GB18030: gb18030-2000",
            "GBK: GBK",
            "ISCII91: iscii, ST_SEV_358-88, iso-ir-153, " +
            "csISO153GOST1976874",
            "ISO-2022-CN-CNS: ISO2022CN_CNS",
            "ISO-2022-CN-GB: ISO2022CN_GB",
            "ISO-2022-KR: ISO2022KR, csISO2022KR",
            "ISO-8859-1: iso-ir-100, 8859_1, ISO_8859-1, " +
            "ISO8859_1, 819, csISOLatin1, IBM-819, " +
            "ISO_8859-1:1987, latin1, cp819, ISO8859-1, " +
            "IBM819, ISO_8859_1, l1",
            "ISO-8859-13",
            "ISO-8859-15: 8859_15, csISOlatin9, IBM923, cp923," +
            " 923, L9, IBM-923, ISO8859-15, LATIN9, " +
            "ISO_8859-15, LATIN0, csISOlatin0, " +
            "ISO8859_15_FDIS, ISO-8859-15",
            "ISO-8859-2", "ISO-8859-3", "ISO-8859-4",
            "ISO-8859-5", "ISO-8859-6", "ISO-8859-7",
            "ISO-8859-8", "ISO-8859-9",
            "JIS0201: X0201, JIS_X0201, csHalfWidthKatakana",
            "JIS0208: JIS_C6626-1983, csISO87JISX0208, x0208, " +
            "JIS_X0208-1983, iso-ir-87",
            "JIS0212: jis_x0212-1990, x0212, iso-ir-159, " +
            "csISO159JISC02121990",
            "Johab: ms1361, ksc5601_1992, ksc5601-1992",
            "KOI8-R",
            "Shift_JIS: shift-jis, x-sjis, ms_kanji, " +
            "shift_jis, csShiftJIS, sjis, pck",
            "TIS-620",
            "US-ASCII: IBM367, ISO646-US, ANSI_X3.4-1986, " +
            "cp367, ASCII, iso_646.irv:1983, 646, us, iso-ir-6,"+
            " csASCII, ANSI_X3.4-1968, ISO_646.irv:1991",
            "UTF-16: UTF_16",
            "UTF-16BE: X-UTF-16BE, UTF_16BE, ISO-10646-UCS-2",
            "UTF-16LE: UTF_16LE, X-UTF-16LE",
            "UTF-8: UTF8", "windows-1250", "windows-1251",
            "windows-1252: cp1252",
            "windows-1253", "windows-1254", "windows-1255",
            "windows-1256", "windows-1257", "windows-1258",
            "windows-936: ms936, ms_936",
            "windows-949: ms_949, ms949", "windows-950: ms950",
        });
    }
} ///:~
So, returning to BufferToText.java, if you rewind( ) the buffer (to go back to the beginning of the data) and then use that platform's default character set to decode( ) the data, the resulting CharBuffer will print to the console just fine. To discover the default character set, use System.getProperty(« file.encoding »), which produces the string that names the character set. Passing this to Charset.forName( ) produces the Charset object that can be used to decode the string.
Another alternative is to encode( ) using a character set that will result in something printable when the file is read, as you see in the third part of BufferToText.java. Here, UTF-16BE is used to write the text into the file, and when it is read, all you have to do is convert it to a CharBuffer, and it produces the expected text.
Finally, you see what happens if you write to the ByteBuffer through a CharBuffer (you'll learn more about this later). Note that 24 bytes are allocated for the ByteBuffer. Since each char requires two bytes, this is enough for 12 chars, but « Some text » only has 9. The remaining zero bytes still appear in the representation of the CharBuffer produced by its toString( ), as you can see in the output.
XII-I-2. Fetching primitives▲
Although a ByteBuffer only holds bytes, it contains methods to produce each of the different types of primitive values from the bytes it contains. This example shows the insertion and extraction of various values using these methods:
//: c12:GetData.java
// Getting different representations from a ByteBuffer
import java.nio.*;
import com.bruceeckel.simpletest.*;

public class GetData {
    private static Test monitor = new Test();
    private static final int BSIZE = 1024;
    public static void main(String[] args) {
        ByteBuffer bb = ByteBuffer.allocate(BSIZE);
        // Allocation automatically zeroes the ByteBuffer:
        int i = 0;
        while(i++ < bb.limit())
            if(bb.get() != 0)
                System.out.println("nonzero");
        System.out.println("i = " + i);
        bb.rewind();
        // Store and read a char array:
        bb.asCharBuffer().put("Howdy!");
        char c;
        while((c = bb.getChar()) != 0)
            System.out.print(c + " ");
        System.out.println();
        bb.rewind();
        // Store and read a short:
        bb.asShortBuffer().put((short)471142);
        System.out.println(bb.getShort());
        bb.rewind();
        // Store and read an int:
        bb.asIntBuffer().put(99471142);
        System.out.println(bb.getInt());
        bb.rewind();
        // Store and read a long:
        bb.asLongBuffer().put(99471142);
        System.out.println(bb.getLong());
        bb.rewind();
        // Store and read a float:
        bb.asFloatBuffer().put(99471142);
        System.out.println(bb.getFloat());
        bb.rewind();
        // Store and read a double:
        bb.asDoubleBuffer().put(99471142);
        System.out.println(bb.getDouble());
        bb.rewind();
        monitor.expect(new String[] {
            "i = 1025",
            "H o w d y ! ",
            "12390", // Truncation changes the value
            "99471142",
            "99471142",
            "9.9471144E7",
            "9.9471142E7"
        });
    }
} ///:~
After a ByteBuffer is allocated, its values are checked to see whether buffer allocation automatically zeroes the contents-and it does. All 1,024 values are checked (up to the limit( ) of the buffer), and all are zero.
The easiest way to insert primitive values into a ByteBuffer is to get the appropriate « view » on that buffer using asCharBuffer( ), asShortBuffer( ), etc., and then to use that view's put( ) method. You can see this is the process used for each of the primitive data types. The only one of these that is a little odd is the put( ) for the ShortBuffer, which requires a cast (note that the cast truncates and changes the resulting value). All the other view buffers do not require casting in their put( ) methods.
XII-I-3. View buffers▲
A « view buffer » allows you to look at an underlying ByteBuffer through the window of a particular primitive type. The ByteBuffer is still the actual storage that's « backing » the view, so any changes you make to the view are reflected in modifications to the data in the ByteBuffer. As seen in the previous example, this allows you to conveniently insert primitive types into a ByteBuffer. A view also allows you to read primitive values from a ByteBuffer, either one at a time (as ByteBuffer allows) or in batches (into arrays). Here's an example that manipulates ints in a ByteBuffer via an IntBuffer:
//: c12:IntBufferDemo.java
// Manipulating ints in a ByteBuffer with an IntBuffer
import java.nio.*;
import com.bruceeckel.simpletest.*;
import com.bruceeckel.util.*;

public class IntBufferDemo {
    private static Test monitor = new Test();
    private static final int BSIZE = 1024;
    public static void main(String[] args) {
        ByteBuffer bb = ByteBuffer.allocate(BSIZE);
        IntBuffer ib = bb.asIntBuffer();
        // Store an array of int:
        ib.put(new int[] { 11, 42, 47, 99, 143, 811, 1016 });
        // Absolute location read and write:
        System.out.println(ib.get(3));
        ib.put(3, 1811);
        ib.rewind();
        while(ib.hasRemaining()) {
            int i = ib.get();
            if(i == 0) break; // Else we'll get the entire buffer
            System.out.println(i);
        }
        monitor.expect(new String[] {
            "99",
            "11",
            "42",
            "47",
            "1811",
            "143",
            "811",
            "1016"
        });
    }
} ///:~
The overloaded put( ) method is first used to store an array of int. The following get( ) and put( ) method calls directly access an int location in the underlying ByteBuffer. Note that these absolute location accesses are available for primitive types by talking directly to a ByteBuffer, as well.
Once the underlying ByteBuffer is filled with ints or some other primitive type via a view buffer, then that ByteBuffer can be written directly to a channel. You can just as easily read from a channel and use a view buffer to convert everything to a particular type of primitive. Here's an example that interprets the same sequence of bytes as short, int, float, long, and double by producing different view buffers on the same ByteBuffer:
//: c12:ViewBuffers.java
import java.nio.*;
import com.bruceeckel.simpletest.*;

public class ViewBuffers {
    private static Test monitor = new Test();
    public static void main(String[] args) {
        ByteBuffer bb = ByteBuffer.wrap(
            new byte[]{ 0, 0, 0, 0, 0, 0, 0, 'a' });
        bb.rewind();
        System.out.println("Byte Buffer");
        while(bb.hasRemaining())
            System.out.println(bb.position()+ " -> " + bb.get());
        CharBuffer cb =
            ((ByteBuffer)bb.rewind()).asCharBuffer();
        System.out.println("Char Buffer");
        while(cb.hasRemaining())
            System.out.println(cb.position()+ " -> " + cb.get());
        FloatBuffer fb =
            ((ByteBuffer)bb.rewind()).asFloatBuffer();
        System.out.println("Float Buffer");
        while(fb.hasRemaining())
            System.out.println(fb.position()+ " -> " + fb.get());
        IntBuffer ib =
            ((ByteBuffer)bb.rewind()).asIntBuffer();
        System.out.println("Int Buffer");
        while(ib.hasRemaining())
            System.out.println(ib.position()+ " -> " + ib.get());
        LongBuffer lb =
            ((ByteBuffer)bb.rewind()).asLongBuffer();
        System.out.println("Long Buffer");
        while(lb.hasRemaining())
            System.out.println(lb.position()+ " -> " + lb.get());
        ShortBuffer sb =
            ((ByteBuffer)bb.rewind()).asShortBuffer();
        System.out.println("Short Buffer");
        while(sb.hasRemaining())
            System.out.println(sb.position()+ " -> " + sb.get());
        DoubleBuffer db =
            ((ByteBuffer)bb.rewind()).asDoubleBuffer();
        System.out.println("Double Buffer");
        while(db.hasRemaining())
            System.out.println(db.position()+ " -> " + db.get());
        monitor.expect(new String[] {
            "Byte Buffer",
            "0 -> 0",
            "1 -> 0",
            "2 -> 0",
            "3 -> 0",
            "4 -> 0",
            "5 -> 0",
            "6 -> 0",
            "7 -> 97",
            "Char Buffer",
            "0 -> \0",
            "1 -> \0",
            "2 -> \0",
            "3 -> a",
            "Float Buffer",
            "0 -> 0.0",
            "1 -> 1.36E-43",
            "Int Buffer",
            "0 -> 0",
            "1 -> 97",
            "Long Buffer",
            "0 -> 97",
            "Short Buffer",
            "0 -> 0",
            "1 -> 0",
            "2 -> 0",
            "3 -> 97",
            "Double Buffer",
            "0 -> 4.8E-322"
        });
    }
} ///:~
The ByteBuffer is produced by « wrapping » an eight-byte array, which is then displayed via view buffers of all the different primitive types. You can see in the following diagram the way the data appears differently when read from the different types of buffers:
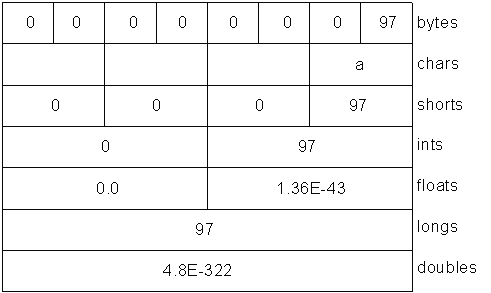
This corresponds to the output from the program.
XII-I-3-a. Endians▲
Different machines may use different byte-ordering approaches to store data. « Big endian » places the most significant byte in the lowest memory address, and « little endian » places the most significant byte in the highest memory address. When storing a quantity that is greater than one byte, like int, float, etc.,you may need to consider the byte ordering. A ByteBuffer stores data in big endian form, and data sent over a network always uses big endian order. You can change the endian-ness of a ByteBuffer using order( ) with an argument of ByteOrder.BIG_ENDIAN or ByteOrder.LITTLE_ENDIAN.
Consider a ByteBuffer containing the following two bytes:

If you read the data as a short (ByteBuffer.asShortBuffer( )), you will get the number 97 (00000000 01100001), but if you change to little endian, you will get the number 24832 (01100001 00000000).
Here's an example that shows how byte ordering is changed in characters depending on the endian setting:
//: c12:Endians.java
// Endian differences and data storage.
import java.nio.*;
import com.bruceeckel.simpletest.*;
import com.bruceeckel.util.*;

public class Endians {
    private static Test monitor = new Test();
    public static void main(String[] args) {
        ByteBuffer bb = ByteBuffer.wrap(new byte[12]);
        bb.asCharBuffer().put("abcdef");
        System.out.println(Arrays2.toString(bb.array()));
        bb.rewind();
        bb.order(ByteOrder.BIG_ENDIAN);
        bb.asCharBuffer().put("abcdef");
        System.out.println(Arrays2.toString(bb.array()));
        bb.rewind();
        bb.order(ByteOrder.LITTLE_ENDIAN);
        bb.asCharBuffer().put("abcdef");
        System.out.println(Arrays2.toString(bb.array()));
        monitor.expect(new String[]{
            "[0, 97, 0, 98, 0, 99, 0, 100, 0, 101, 0, 102]",
            "[0, 97, 0, 98, 0, 99, 0, 100, 0, 101, 0, 102]",
            "[97, 0, 98, 0, 99, 0, 100, 0, 101, 0, 102, 0]"
        });
    }
} ///:~
The ByteBuffer is given enough space to hold all the bytes in charArray as an external buffer so that that array( ) method can be called to display the underlying bytes. The array( ) method is « optional, » and you can only call it on a buffer that is backed by an array; otherwise, you'll get an UnsupportedOperationException.
charArray is inserted into the ByteBuffer via a CharBuffer view. When the underlying bytes are displayed, you can see that the default ordering is the same as the subsequent big endian order, whereas the little endian order swaps the bytes.
XII-I-4. Data manipulation with buffers▲
The diagram here illustrates the relationships between the nio classes, so that you can see how to move and convert data. For example, if you wish to write a byte array to a file, then you wrap the byte array using the ByteBuffer.wrap( ) method, open a channel on the FileOutputStream using the getChannel( ) method, and then write data into FileChannel from this ByteBuffer.
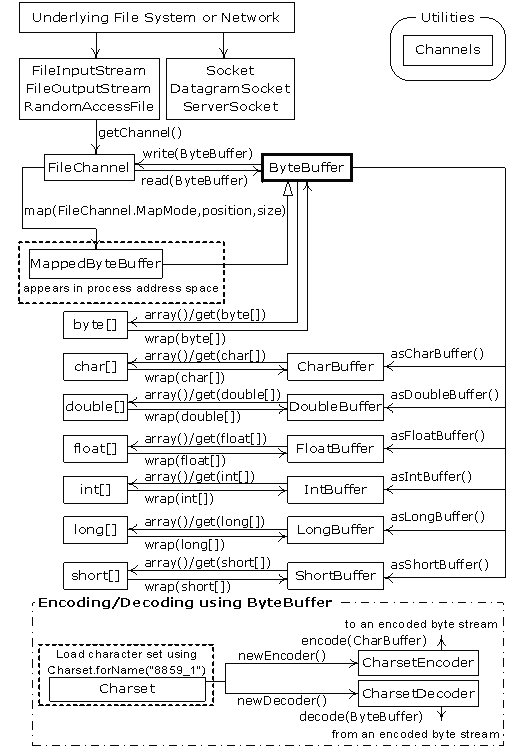
Note that ByteBuffer is the only way to move data in and out of channels, and that you can only create a standalone primitive-typed buffer, or get one from a ByteBuffer using an « as » method. That is, you cannot convert a primitive-typed buffer to a ByteBuffer. However, since you are able to move primitive data into and out of a ByteBuffer via a view buffer, this is not really a restriction.
XII-I-5. Buffer details▲
A Buffer consists of data and four indexes to access and manipulate this data efficiently: mark, position, limit and capacity. There are methods to set and reset these indexes and to query their value.
|
capacity( ) |
Returns the buffer's capacity |
|
clear( ) |
Clears the buffer, sets the position to zero, and limit to capacity. You call this method to overwrite an existing buffer. |
|
flip( ) |
Sets limit to position and position to zero. This method is used to prepare the buffer for a read after data has been written into it. |
|
limit( ) |
Returns the value of limit. |
|
limit(int lim) |
Sets the value of limit. |
|
mark( ) |
Sets mark at position. |
|
position( ) |
Returns the value of position. |
|
position(int pos) |
Sets the value of position. |
|
remaining( ) |
Returns (limit - position). |
|
hasRemaining( ) |
Returns true if there are any elements between position and limit. |
Methods that insert and extract data from the buffer update these indexes to reflect the changes.
This example uses a very simple algorithm (swapping adjacent characters) to scramble and unscramble characters in a CharBuffer:
//: c12:UsingBuffers.java
import java.nio.*;
import com.bruceeckel.simpletest.*;

public class UsingBuffers {
    private static Test monitor = new Test();
    private static void symmetricScramble(CharBuffer buffer){
        while(buffer.hasRemaining()) {
            buffer.mark();
            char c1 = buffer.get();
            char c2 = buffer.get();
            buffer.reset();
            buffer.put(c2).put(c1);
        }
    }
    public static void main(String[] args) {
        char[] data = "UsingBuffers".toCharArray();
        ByteBuffer bb = ByteBuffer.allocate(data.length * 2);
        CharBuffer cb = bb.asCharBuffer();
        cb.put(data);
        System.out.println(cb.rewind());
        symmetricScramble(cb);
        System.out.println(cb.rewind());
        symmetricScramble(cb);
        System.out.println(cb.rewind());
        monitor.expect(new String[] {
            "UsingBuffers",
            "sUniBgfuefsr",
            "UsingBuffers"
        });
    }
} ///:~
Although you could produce a CharBuffer directly by calling wrap( ) with a char array, an underlying ByteBuffer is allocated instead, and a CharBuffer is produced as a view on the ByteBuffer. This emphasizes that fact that the goal is always to manipulate a ByteBuffer, since that is what interacts with a channel.
Here's what the buffer looks like after the put( ):
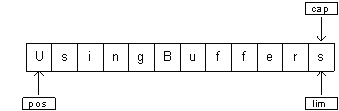
The position points to the first element in the buffer, and the capacity and limit point to the last element.
In symmetricScramble( ), the while loop iterates until position is equivalent to limit. The position of the buffer changes when a relative get( ) or put( ) function is called on it. You can also call absolute get( ) and put( ) methods that include an index argument, which is the location where the get( ) or put( ) takes place. These methods do not modify the value of the buffer's position.
When the control enters the while loop, the value of mark is set using mark( ) call. The state of the buffer then:
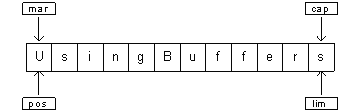
The two relative get( ) calls save the value of the first two characters in variables c1 and c2. After these two calls, the buffer looks like this:
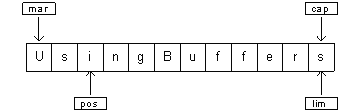
To perform the swap, we need to write c2 at position = 0 and c1 at position = 1. We can either use the absolute put method to achieve this, or set the value of position to mark, which is what reset( ) does:
The two put( ) methods write c2 and then c1:
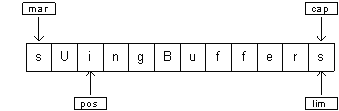
During the next iteration of the loop, mark is set to the current value of position:
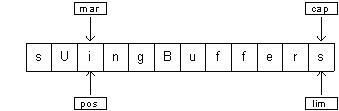
The process continues until the entire buffer is traversed. At the end of the while loop, position is at the end of the buffer. If you print the buffer, only the characters between the position and limit are printed. Thus, if you want to show the entire contents of the buffer you must set position to the start of the buffer using rewind( ). Here is the state of buffer after the rewind( ) call (the value of mark becomes undefined):
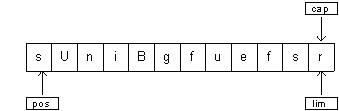
When the function symmetricScramble( ) is called again, the CharBuffer undergoes the same process and is restored to its original state.
XII-I-6. Memory-mapped files▲
Memory-mapped files allow you to create and modify files that are too big to bring into memory. With a memory-mapped file, you can pretend that the entire file is in memory and that you can access it by simply treating it as a very large array. This approach greatly simplifies the code you write in order to modify the file. Here's a small example:
//: c12:LargeMappedFiles.java
// Creating a very large file using mapping.
// {RunByHand}
// {Clean: test.dat}
import java.io.*;
import java.nio.*;
import java.nio.channels.*;

public class LargeMappedFiles {
    static int length = 0x8FFFFFF; // 128 Mb
    public static void main(String[] args) throws Exception {
        MappedByteBuffer out =
            new RandomAccessFile("test.dat", "rw").getChannel()
                .map(FileChannel.MapMode.READ_WRITE, 0, length);
        for(int i = 0; i < length; i++)
            out.put((byte)'x');
        System.out.println("Finished writing");
        for(int i = length/2; i < length/2 + 6; i++)
            System.out.print((char)out.get(i));
    }
} ///:~
To do both writing and reading, we start with a RandomAccessFile, get a channel for that file, and then call map( ) to produce a MappedByteBuffer, which is a particular kind of direct buffer. Note that you must specify the starting point and the length of the region that you want to map in the file; this means that you have the option to map smaller regions of a large file.
MappedByteBuffer is inherited from ByteBuffer, so it has all of ByteBuffer's methods. Only the very simple uses of put( ) and get( ) are shown here, but you can also use things like asCharBuffer( ), etc.
The file created with the preceding program is 128 MB long, which is probably larger than the space your OS will allow. The file appears to be accessible all at once because only portions of it are brought into memory, and other parts are swapped out. This way a very large file (up to 2 GB) can easily be modified. Note that the file-mapping facilities of the underlying operating system are used to maximize performance.
XII-I-6-a. Performance▲
Although the performance of « old » stream I/O has been improved by implementing it with nio, mapped file access tends to be dramatically faster. This program does a simple performance comparison:
//: c12:MappedIO.java
// {Clean: temp.tmp}
import java.io.*;
import java.nio.*;
import java.nio.channels.*;

public class MappedIO {
    private static int numOfInts = 4000000;
    private static int numOfUbuffInts = 200000;
    private abstract static class Tester {
        private String name;
        public Tester(String name) { this.name = name; }
        public long runTest() {
            System.out.print(name + ": ");
            try {
                long startTime = System.currentTimeMillis();
                test();
                long endTime = System.currentTimeMillis();
                return (endTime - startTime);
            } catch (IOException e) {
                throw new RuntimeException(e);
            }
        }
        public abstract void test() throws IOException;
    }
    private static Tester[] tests = {
        new Tester("Stream Write") {
            public void test() throws IOException {
                DataOutputStream dos = new DataOutputStream(
                    new BufferedOutputStream(
                        new FileOutputStream(new File("temp.tmp"))));
                for(int i = 0; i < numOfInts; i++)
                    dos.writeInt(i);
                dos.close();
            }
        },
        new Tester("Mapped Write") {
            public void test() throws IOException {
                FileChannel fc =
                    new RandomAccessFile("temp.tmp", "rw")
                        .getChannel();
                IntBuffer ib = fc.map(
                    FileChannel.MapMode.READ_WRITE, 0, fc.size())
                    .asIntBuffer();
                for(int i = 0; i < numOfInts; i++)
                    ib.put(i);
                fc.close();
            }
        },
        new Tester("Stream Read") {
            public void test() throws IOException {
                DataInputStream dis = new DataInputStream(
                    new BufferedInputStream(
                        new FileInputStream("temp.tmp")));
                for(int i = 0; i < numOfInts; i++)
                    dis.readInt();
                dis.close();
            }
        },
        new Tester("Mapped Read") {
            public void test() throws IOException {
                FileChannel fc = new FileInputStream(
                    new File("temp.tmp")).getChannel();
                IntBuffer ib = fc.map(
                    FileChannel.MapMode.READ_ONLY, 0, fc.size())
                .asIntBuffer();
                while(ib.hasRemaining())
                    ib.get();
                fc.close();
            }
        },
        new Tester("Stream Read/Write") {
            public void test() throws IOException {
                RandomAccessFile raf = new RandomAccessFile(
                    new File("temp.tmp"), "rw");
                raf.writeInt(1);
                for(int i = 0; i < numOfUbuffInts; i++) {
                    raf.seek(raf.length() - 4);
                    raf.writeInt(raf.readInt());
                }
                raf.close();
            }
        },
        new Tester("Mapped Read/Write") {
            public void test() throws IOException {
                FileChannel fc = new RandomAccessFile(
                    new File("temp.tmp"), "rw").getChannel();
                IntBuffer ib = fc.map(
                    FileChannel.MapMode.READ_WRITE, 0, fc.size())
                    .asIntBuffer();
                ib.put(0);
                for(int i = 1; i < numOfUbuffInts; i++)
                    ib.put(ib.get(i - 1));
                fc.close();
            }
        }
    };
    public static void main(String[] args) {
        for(int i = 0; i < tests.length; i++)
            System.out.println(tests[i].runTest());
    }
} ///:~
As seen in earlier examples in this book, runTest( ) is the Template Method that provides the testing framework for various implementations of test( ) defined in anonymous inner subclasses. Each of these subclasses perform one kind of test, so the test( ) methods also give you a prototype for performing the various I/O activities.
Although a mapped write would seem to use a FileOutputStream, all output in file mapping must use a RandomAccessFile, just as read/write does in the preceding code.
Here's the output from one run:
Stream Write: 1719
Mapped Write: 359
Stream Read: 750
Mapped Read: 125
Stream Read/Write: 5188
Mapped Read/Write: 16
Note that the test( ) methods include the time for initialization of the various I/O objects, so even though the setup for mapped files can be expensive, the overall gain compared to stream I/O is significant.
XII-I-7. File locking▲
File locking, introduced in JDK 1.4, allows you to synchronize access to a file as a shared resource. However, the two threads that contend for the same file may be in different JVMs, or one may be a Java thread and the other some native thread in the operating system. The file locks are visible to other operating system processes because Java file locking maps directly to the native operating system locking facility.
Here is a simple example of file locking.
//: c12:FileLocking.java
// {Clean: file.txt}
import java.io.FileOutputStream;
import java.nio.channels.*;

public class FileLocking {
    public static void main(String[] args) throws Exception {
        FileOutputStream fos= new FileOutputStream("file.txt");
        FileLock fl = fos.getChannel().tryLock();
        if(fl != null) {
            System.out.println("Locked File");
            Thread.sleep(100);
            fl.release();
            System.out.println("Released Lock");
        }
        fos.close();
    }
} ///:~
You get a FileLock on the entire file by calling either tryLock( ) or lock( ) on a FileChannel. (SocketChannel, DatagramChannel, and ServerSocketChannel do not need locking since they are inherently single-process entities; you don't generally share a network socket between two processes.) tryLock( ) is non-blocking. It tries to grab the lock, but if it cannot (when some other process already holds the same lock and it is not shared), it simply returns from the method call. lock( ) blocks until the lock is acquired, or the thread that invoked lock( ) is interrupted, or the channel on which the lock( ) method is called is closed. A lock is released using FileLock.release( ).
It is also possible to lock a part of the file by using
tryLock(long position, long size, boolean shared)or
lock(long position, long size, boolean shared)which locks the region (size - position). The third argument specifies whether this lock is shared.
Although the zero-argument locking methods adapt to changes in the size of a file, locks with a fixed size do not change if the file size changes. If a lock is acquired for a region from position to position+size and the file increases beyond position+size, then the section beyond position+size is not locked. The zero-argument locking methods lock the entire file, even if it grows.
Support for exclusive or shared locks must be provided by the underlying operating system. If the operating system does not support shared locks and a request is made for one, an exclusive lock is used instead. The type of lock (shared or exclusive) can be queried using FileLock.isShared( ).
XII-I-7-a. Locking portions of a mapped file▲
As mentioned earlier, file mapping is typically used for very large files. One thing that you may need to do with such a large file is to lock portions of it so that other processes may modify unlocked parts of the file. This is something that happens, for example, with a database, so that it can be available to many users at once.
Here's an example that has two threads, each of which locks a distinct portion of a file:
//: c12:LockingMappedFiles.java
// Locking portions of a mapped file.
// {RunByHand}
// {Clean: test.dat}
import java.io.*;
import java.nio.*;
import java.nio.channels.*;

public class LockingMappedFiles {
    static final int LENGTH = 0x8FFFFFF; // 128 Mb
    static FileChannel fc;
    public static void main(String[] args) throws Exception {
        fc =
            new RandomAccessFile("test.dat", "rw").getChannel();
        MappedByteBuffer out =
            fc.map(FileChannel.MapMode.READ_WRITE, 0, LENGTH);
        for(int i = 0; i < LENGTH; i++)
            out.put((byte)'x');
        new LockAndModify(out, 0, 0 + LENGTH/3);
        new LockAndModify(out, LENGTH/2, LENGTH/2 + LENGTH/4);
    }
    private static class LockAndModify extends Thread {
        private ByteBuffer buff;
        private int start, end;
        LockAndModify(ByteBuffer mbb, int start, int end) {
            this.start = start;
            this.end = end;
            mbb.limit(end);
            mbb.position(start);
            buff = mbb.slice();
            start();
        }
        public void run() {
            try {
                // Exclusive lock with no overlap:
                FileLock fl = fc.lock(start, end, false);
                System.out.println("Locked: "+ start +" to "+ end);
                // Perform modification:
                while(buff.position() < buff.limit() - 1)
                    buff.put((byte)(buff.get() + 1));
                fl.release();
                System.out.println("Released: "+start+" to "+ end);
            } catch(IOException e) {
                throw new RuntimeException(e);
            }
        }
    }
} ///:~
The LockAndModify thread class sets up the buffer region and creates a slice( ) to be modified, and in run( ), the lock is acquired on the file channel (you can't acquire a lock on the buffer-only the channel). The call to lock( ) is very similar to acquiring a threading lock on an object-you now have a « critical section » with exclusive access to that portion of the file.
The locks are automatically released when the JVM exits, or the channel on which it was acquired is closed, but you can also explicitly call release( ) on the FileLock object, as shown here.
XII-J. Compression▲
La bibliothèque Java d'E/S contient des classes pour supporter la lecture et l'écriture de flux dans un format compressé. Celles-ci sont enveloppées dans les classes existantes d'E/S pour fournir des fonctionnalités de compression.
Ces classes ne sont pas dérivées des classes Reader et Writer, mais à la place font partie des hiérarchies InputStream and OutputStream. Ceci parce que la libraire de compression fonctionne avec des octets, pas des caractères. Cependant, vous serez parfois forcés de mélanger les deux types de flux. (Rappellez-vous que vous pouvez utiliser InputStreamReader et OutputStreamWriter pour fournir une conversion facile entre un type et un autre).
|
Classe de compression |
Fonction |
|---|---|
|
CheckedInputStream |
GetCheckSum( ) fait un checksum (vérification des bits transmis afin de déceler des erreurs de transmission) pour n'importe quel InputStream (non uniquement pour une décompression). |
|
CheckedOutputStream |
GetCheckSum( ) fait ue checksum pour n'importe quel OutputStream (non uniquement pour une décompression). |
|
DeflaterOutputStream |
Classe de base pour les classes de compression. |
|
ZipOutputStream |
Un DeflaterOutputStream qui compresse les données au format Zip. |
|
GZIPOutputStream |
Un DeflaterOutputStream qui compresse les données au format GZIP. |
|
InflaterInputStream |
Classe de base pour les classes de décompression. |
|
ZipInputStream |
Un InflaterInputStream qui décompresse des données stockées au format Zip. |
|
GZIPInputStream |
Un InflaterInputStream qui décompresse des données stockées au format GZIP. |
Bien qu'il y ait de nombreux algorithmes de compression, Zip et GZIP sont peut-être ceux employés le plus couramment. Ainsi vous pouvez facilement manipuler vos données compressées avec les nombreux outils disponibles pour écrire et lire ces formats.
XII-J-1. Compression simple avec GZIP▲
L'interface GZIP est simple et est ainsi la plus appropriée quand vous avez un simple flux de données que vous désirez compresser (plutôt qu'un conteneur de pièces différentes de données). Voici un exemple qui compresse un simple fichier :
//: c12:GZIPcompress.java
// {Args: GZIPcompress.java}
// {Clean: test.gz}
import com.bruceeckel.simpletest.*;
import java.io.*;
import java.util.zip.*;

public class GZIPcompress {
    private static Test monitor = new Test();
    // Lance les exceptions vers la console :
    public static void main(String[] args)
            throws IOException {
        if(args.length == 0) {
            System.out.println(
                "Usage: \nGZIPcompress file\n" +
                "\tUses GZIP compression to compress " +
                "the file to test.gz");
            System.exit(1);
        }
        BufferedReader in = new BufferedReader(
            new FileReader(args[0]));
        BufferedOutputStream out = new BufferedOutputStream(
            new GZIPOutputStream(
                new FileOutputStream("test.gz")));
        System.out.println("Writing file");
        int c;
        while((c = in.read()) != -1)
            out.write(c);
        in.close();
        out.close();
        System.out.println("Reading file");
        BufferedReader in2 = new BufferedReader(
            new InputStreamReader(new GZIPInputStream(
                new FileInputStream("test.gz"))));
        String s;
        while((s = in2.readLine()) != null)
            System.out.println(s);
        monitor.expect(new String[] {
            "Writing file",
            "Reading file"
        }, args[0]);
    }
} ///:~
L'emploi des classes de compression est simple ; vous enveloppez simplement votre flux de sortie dans un GZIPOutputStream ou un ZipOutputStream, et votre flux d'entrée dans un GZIPInputStream ou un ZipInputStream. Tout le reste étant de l'écriture et de la lecture normale d'E/S. C'est un exemple de mélange de flux orientés char avec des flux orientés byte ; in utilise les classes Reader, alors que le constructeur d'un GZIPOutputStream peut seulement accepter un objet OutputStream, et non pas un objet Writer. Quand le fichier est ouvert, le GZIPInputStream est converti en un Reader.
XII-J-2. Stockage de fichiers multiples avec Zip▲
La bibliothèque qui supporte le format Zip est beaucoup plus large. Avec elle vous pouvez facilement stocker des fichiers multiples, et il y a même une classe séparée pour procéder à la lecture d'un fichier Zip simple. La bibliothèque utilise le format Zip standard de manière à ce qu'il fonctionne avec tous les outils couramment téléchargeables sur l'Internet. L'exemple suivant prend la même forme que l'exemple précédent, mais il manipule autant d'arguments de ligne de commande que vous le désirez. De plus, il met en valeur l'emploi de la classe Checksum pour calculer et vérifier la somme de contrôle du fichier. Il y a deux sortes de Checksum : Adler32 (qui est plus rapide) et CRC32 (qui est plus lent, mais un peu plus précis).
//: c12:ZipCompress.java
// Emploi de la compression Zip pour compresser n'importe quel
// nombre de fichiers passés en ligne de commande.
// {Args: ZipCompress.java}
// {Clean: test.zip}
import com.bruceeckel.simpletest.*;
import java.io.*;
import java.util.*;
import java.util.zip.*;

public class ZipCompress {
    private static Test monitor = new Test();
    // Lance les exceptions vers la console :
    public static void main(String[] args)
    throws IOException {
        FileOutputStream f = new FileOutputStream("test.zip");
        CheckedOutputStream csum =
            new CheckedOutputStream(f, new Adler32());
        ZipOutputStream zos = new ZipOutputStream(csum);
        BufferedOutputStream out =
            new BufferedOutputStream(zos);
        zos.setComment("A test of Java Zipping");
        // Pas de getComment() correspondant, cependant.
        for(int i = 0; i < args.length; i++) {
            System.out.println("Writing file " + args[i]);
            BufferedReader in =
                new BufferedReader(new FileReader(args[i]));
            zos.putNextEntry(new ZipEntry(args[i]));
            int c;
            while((c = in.read()) != -1)
                out.write(c);
            in.close();
        }
        out.close();
        // Validation de Checksum seulement après fermeture du fichier
        System.out.println("Checksum: " +
            csum.getChecksum().getValue());
        // Maintenant extrait les fichiers :
        System.out.println("Reading file");
        FileInputStream fi = new FileInputStream("test.zip");
        CheckedInputStream csumi =
            new CheckedInputStream(fi, new Adler32());
        ZipInputStream in2 = new ZipInputStream(csumi);
        BufferedInputStream bis = new BufferedInputStream(in2);
        ZipEntry ze;
        while((ze = in2.getNextEntry()) != null) {
            System.out.println("Reading file " + ze);
            int x;
            while((x = bis.read()) != -1)
                System.out.write(x);
        }
        if(args.length == 1)
            monitor.expect(new String[] {
                "Writing file " + args[0],
                "%% Checksum: \\d+",
                "Reading file",
                "Reading file " + args[0]}, args[0]);
        System.out.println("Checksum: " +
            csumi.getChecksum().getValue());
        bis.close();
        // Méthode alternative pour ouvrir et lire les fichiers zip :
        ZipFile zf = new ZipFile("test.zip");
        Enumeration e = zf.entries();
        while(e.hasMoreElements()) {
            ZipEntry ze2 = (ZipEntry)e.nextElement();
            System.out.println("File: " + ze2);
            // ... et extrait les données comme précédemment.
        }
        if(args.length == 1)
            monitor.expect(new String[] {
                "%% Checksum: \\d+",
                "File: " + args[0]
            });
    }
} ///:~
Pour chaque fichier à ajouter à l'archive, vous devez appeler putNextEntry( ) et lui passer un objet ZipEntry. L'objet ZipEntry contient une large interface qui vous permet d'obtenir et de positionner toutes les données disponibles sur cette entrée précise dans votre fichier Zip : nom, tailles compressé et non-compressé, date, somme de contrôle CRC, données supplémentaires, commentaire, méthode de compression, et s'il s'agit d'une entrée de répertoire. Toutefois, même si le format Zip possède une méthode pour établir un mot de passe, il n'est pas supporté dans la bibliothèque Zip de Java. Et bien que CheckedInputStream et CheckedOutputStream supportent les deux contrôles de somme Adler32 et CRC32, la classe ZipEntry supporte seulement une interface pour la CRC (Contrôle de Redondance Cyclique). C'est une restriction sous-jacente du format Zip, mais elle pourrait vous limiter à l'utilisation de l'Adler32 plus rapide.
Pour extraire les fichiers, ZipInputStream a une méthode getNextEntry( ) qui renvoie la ZipEntry suivante s’il y en a une. Comme alternative plus succincte, vous pouvez lire le fichier en utilisant un objet ZipFile, lequel possède une méthode entries( ) pour renvoyer une Enumeration au ZipEntries.
Afin de lire la somme de contrôle, vous devrez d'une manière ou d'une autre avoir accès à l'objet Checksum associé. Ici, une référence vers les objets CheckedOutputStream et CheckedInputStream est retenue, mais vous pourriez aussi juste vous en tenir à une référence à l'objet Checksum.
Une méthode déconcertante dans les flux de Zip est setComment( ). Comme montré dans ZipCompress.java, vous pouvez établir un commentaire lorsque vous écrivez un fichier, mais il n'y a pas de manière pour récupérer le commentaire dans le ZipInputStream. Les commentaires sont apparemment complètement supportés sur une base d'entrée-par-entrée via un ZipEntry.
Bien sûr, vous n'êtes pas limité aux fichiers lorsque vous utilisez les bibliothèques GZIP ou Zip, vous pouvez compresser n'importe quoi, y compris les données à envoyer par une connexion réseau.
XII-J-3. Java ARchives (JAR)▲
Le format Zip est aussi employé dans le format de fichier JAR (Java ARchive), qui est une manière de rassembler un groupe de fichiers dans un seul fichier compressé, tout à fait comme Zip. Cependant, comme tout le reste en Java, les fichiers JAR sont multiplateformes donc vous n'avez pas à vous soucier des distributions de plate-forme. Vous pouvez aussi inclure des fichiers audio et image en plus des fichiers class.
Les fichiers JAR sont particulièrement utiles quand on a affaire à l'Internet. Avant les fichiers JAR, votre navigateur Web devait faire des requêtes répétées sur un serveur Web afin de télécharger tous les fichiers qui composaient une applet. De plus, aucun de ces fichiers n'était compressé. En combinant tous les fichiers d'une applet précise dans un seul fichier JAR, une seule requête au serveur est nécessaire et le transfert est plus rapide en raison de la compression. Chaque entrée dans un fichier JAR peut être signée numériquement pour la sécurité (voir le chapitre 14 pour un exemple de signature).
Un JAR consiste en un seul fichier contenant une collection de fichiers zippés ensemble avec un « manifeste » qui en fait la description. (Vous pouvez créer votre propre fichier « manifest » ; sinon, le programme jar le fera pour vous). Vous pouvez trouver plus de précision sur les « manifests » des fichiers JAR dans la documentation du JDK.
L'utilitaire jar qui est fourni avec le JDK de Sun compresse automatiquement les fichiers de votre choix. Vous lui faites appel en ligne de commande :
jar [options] destination [manifest] inputfile(s)Les options sont simplement une collection de lettres (aucun trait d'union ou autre indicateur n'est nécessaire). Les utilisateurs d'Unix/Linux noteront la similitude avec les options tar . Celles-ci sont :
|
c |
Crée une archive nouvelle ou vide. |
|
t |
List la table des matières. |
|
x |
Extrait tous les fichiers. |
|
x file |
Extrait le fichier nommé. |
|
f |
Dit : « Je vais vous donner le nom du fichier. » Si vous n'utilisez pas ceci,jar considère que sont entrée viendra de l'entrée standard, ou, s'il crée un fichier, sa sortie ira vers la sortie standard. |
|
m |
Dit que le premier argument sera le nom du fichier manifeste créé par l'utilisateur. |
|
v |
Génère une sortie « verbeuse » décrivant ce que jar effectue. |
|
0 |
Stocke seulement les fichiers ; ne compresse pas les fichiers (utilisé pour créer un fichier JAR que l'on peut mettre dans le classpath). |
|
M |
Ne crée pas automatiquement un fichier « manifest ». |
Si un sous-répertoire est inclus dans les fichiers devant être placés dans le fichier, ce sous-répertoire est ajouté automatiquement, incluant tous ses sous-répertoire, etc. Les informations de chemin sont ainsi préservées.
Voici quelques façons typiques d'invoquer jar:
jar cf myJarFile.jar *.classCeci crée un fichier JAR appelé myJarFile.jar qui contient tous les fichiers class du répertoire courant, avec la génération automatique d'un fichier « manifest ».
jar cmf myJarFile.jar myManifestFile.mf *.classComme l'exemple précédent, mais ajoute un fichier « manifest » créé par l'utilisateur nommé myManifestFile.mf.
jar tf myJarFile.jarProduit une table des matières des fichiers dans myJarFile.jar.
jar tvf myJarFile.jarAjoute le drapeau « verbeux » pour donner des informations plus détaillées sur les fichiers dans myJarFile.jar.
jar cvf myApp.jar audio classes imageSupposant que audio, classes, and image sont des sous-répertoires, ceci combine tous les sous-répertoires dans le fichier myApp.jar. Le drapeau « verbeux » est aussi inclus pour donner un contrôle d'information supplémentaire pendant que le programme jar travaille.
Si vous créez un fichier JAR en utilisant l'option 0 (zero), ce fichier pourra être placé dans votre CLASSPATH:
CLASSPATH="lib1.jar;lib2.jar;"Ainsi Java pourra chercher dans lib1.jar et lib2.jar pour trouver des fichiers class.
L'outil jar n'est pas aussi utile que l'utilitaire zip. Par exemple, vous ne pouvez ajouter ou mettre à jour un fichier JAR existant ; vous pouvez créer des fichiers JAR seulement à partir de zéro. Aussi, vous ne pouvez déplacer les fichiers dans un fichier JAR, les effaçant dès qu'ils sont déplacés. Cependant un fichier JAR créé sur une plate-forme sera lisible de manière transparente par l'outil jar sur n'importe quelle autre plateforme (un problème qui apparaît parfois avec les utilitaires zip).
Comme vous le verrez dans le chapitre 13, les fichiers JAR sont aussi utilisés pour emballer les JavaBeans.
XII-K. Object serialization▲
Java's object serialization allows you to take any object that implements the Serializable interface and turn it into a sequence of bytes that can later be fully restored to regenerate the original object. This is even true across a network, which means that the serialization mechanism automatically compensates for differences in operating systems. That is, you can create an object on a Windows machine, serialize it, and send it across the network to a Unix machine, where it will be correctly reconstructed. You don't have to worry about the data representations on the different machines, the byte ordering, or any other details.
By itself, object serialization is interesting because it allows you to implement lightweight persistence. Remember that persistence means that an object's lifetime is not determined by whether a program is executing; the object lives in between invocations of the program. By taking a serializable object and writing it to disk, then restoring that object when the program is reinvoked, you're able to produce the effect of persistence. The reason it's called « lightweight » is that you can't simply define an object using some kind of « persistent » keyword and let the system take care of the details (although this might happen in the future). Instead, you must explicitly serialize and deserialize the objects in your program. If you need a more serious persistence mechanism, consider Java Data Objects (JDO) or a tool like Hibernate (http://hibernate.sourceforge.net). For details, see Thinking in Enterprise Java, downloadable from www.BruceEckel.com.
Object serialization was added to the language to support two major features. Java's Remote Method Invocation (RMI) allows objects that live on other machines to behave as if they live on your machine. When sending messages to remote objects, object serialization is necessary to transport the arguments and return values. RMI is discussed in Thinking in Enterprise Java.
Object serialization is also necessary for JavaBeans, described in Chapter 14. When a Bean is used, its state information is generally configured at design time. This state information must be stored and later recovered when the program is started; object serialization performs this task.
Serializing an object is quite simple as long as the object implements the Serializable interface (this is a tagging interface and has no methods). When serialization was added to the language, many standard library classes were changed to make them serializable, including all of the wrappers for the primitive types, all of the container classes, and many others. Even Class objects can be serialized.
To serialize an object, you create some sort of OutputStream object and then wrap it inside an ObjectOutputStream object. At this point you need only call writeObject( ), and your object is serialized and sent to the OutputStream. To reverse the process, you wrap an InputStream inside an ObjectInputStream and call readObject( ). What comes back is, as usual, a reference to an upcast Object, so you must downcast to set things straight.
A particularly clever aspect of object serialization is that it not only saves an image of your object, but it also follows all the references contained in your object and saves those objects, and follows all the references in each of those objects, etc. This is sometimes referred to as the « web of objects » that a single object can be connected to, and it includes arrays of references to objects as well as member objects. If you had to maintain your own object serialization scheme, maintaining the code to follow all these links would be a bit mind-boggling. However, Java object serialization seems to pull it off flawlessly, no doubt using an optimized algorithm that traverses the web of objects. The following example tests the serialization mechanism by making a « worm » of linked objects, each of which has a link to the next segment in the worm as well as an array of references to objects of a different class, Data:
//: c12:Worm.java
// Demonstrates object serialization.
// {Clean: worm.out}
import java.io.*;
import java.util.*;

class Data implements Serializable {
    private int n;
    public Data(int n) { this.n = n; }
    public String toString() { return Integer.toString(n); }
}

public class Worm implements Serializable {
    private static Random rand = new Random();
    private Data[] d = {
        new Data(rand.nextInt(10)),
        new Data(rand.nextInt(10)),
        new Data(rand.nextInt(10))
    };
    private Worm next;
    private char c;
    // Value of i == number of segments
    public Worm(int i, char x) {
        System.out.println("Worm constructor: " + i);
        c = x;
        if(--i > 0)
            next = new Worm(i, (char)(x + 1));
    }
    public Worm() {
        System.out.println("Default constructor");
    }
    public String toString() {
        String s = ":" + c + "(";
        for(int i = 0; i < d.length; i++)
            s += d[i];
        s += ")";
        if(next != null)
            s += next;
        return s;
    }
    // Throw exceptions to console:
    public static void main(String[] args)
            throws ClassNotFoundException, IOException {
        Worm w = new Worm(6, 'a');
        System.out.println("w = " + w);
        ObjectOutputStream out = new ObjectOutputStream(
            new FileOutputStream("worm.out"));
        out.writeObject("Worm storage\n");
        out.writeObject(w);
        out.close(); // Also flushes output
        ObjectInputStream in = new ObjectInputStream(
            new FileInputStream("worm.out"));
        String s = (String)in.readObject();
        Worm w2 = (Worm)in.readObject();
        System.out.println(s + "w2 = " + w2);
        ByteArrayOutputStream bout =
            new ByteArrayOutputStream();
        ObjectOutputStream out2 = new ObjectOutputStream(bout);
        out2.writeObject("Worm storage\n");
        out2.writeObject(w);
        out2.flush();
        ObjectInputStream in2 = new ObjectInputStream(
            new ByteArrayInputStream(bout.toByteArray()));
        s = (String)in2.readObject();
        Worm w3 = (Worm)in2.readObject();
        System.out.println(s + "w3 = " + w3);
    }
} ///:~
To make things interesting, the array of Data objects inside Worm are initialized with random numbers. (This way you don't suspect the compiler of keeping some kind of meta-information.) Each Worm segment is labeled with a char that's automatically generated in the process of recursively generating the linked list of Worms. When you create a Worm, you tell the constructor how long you want it to be. To make the next reference, it calls the Worm constructor with a length of one less, etc. The final next reference is left as null, indicating the end of the Worm.
The point of all this was to make something reasonably complex that couldn't easily be serialized. The act of serializing, however, is quite simple. Once the ObjectOutputStream is created from some other stream, writeObject( ) serializes the object. Notice the call to writeObject( ) for a String, as well. You can also write all the primitive data types using the same methods as DataOutputStream (they share the same interface).
There are two separate code sections that look similar. The first writes and reads a file and the second, for variety, writes and reads a ByteArray. You can read and write an object using serialization to any DataInputStream or DataOutputStream including, as you can see in Thinking in Enterprise Java, a network. The output from one run was:
Worm constructor: 6
Worm constructor: 5
Worm constructor: 4
Worm constructor: 3
Worm constructor: 2
Worm constructor: 1
w = :a(414):b(276):c(773):d(870):e(210):f(279)
Worm storage
w2 = :a(414):b(276):c(773):d(870):e(210):f(279)
Worm storage
w3 = :a(414):b(276):c(773):d(870):e(210):f(279)
You can see that the deserialized object really does contain all of the links that were in the original object.
Note that no constructor, not even the default constructor, is called in the process of deserializing a Serializable object. The entire object is restored by recovering data from the InputStream.
Object serialization is byte-oriented, and thus uses the InputStream and OutputStream hierarchies.
XII-K-1. Finding the class▲
You might wonder what's necessary for an object to be recovered from its serialized state. For example, suppose you serialize an object and send it as a file or through a network to another machine. Could a program on the other machine reconstruct the object using only the contents of the file?
The best way to answer this question is (as usual) by performing an experiment. The following file goes in the subdirectory for this chapter:
//: c12:Alien.java
// A serializable class.
import java.io.*;
public class Alien implements Serializable {} ///:~
The file that creates and serializes an Alien object goes in the same directory:
//: c12:FreezeAlien.java
// Create a serialized output file.
// {Clean: X.file}
import java.io.*;

public class FreezeAlien {
    // Throw exceptions to console:
    public static void main(String[] args) throws Exception {
        ObjectOutput out = new ObjectOutputStream(
            new FileOutputStream("X.file"));
        Alien zorcon = new Alien();
        out.writeObject(zorcon);
    }
} ///:~
Rather than catching and handling exceptions, this program takes the quick-and-dirty approach of passing the exceptions out of main( ), so they'll be reported on the console.
Once the program is compiled and run, it produces a file called X.file in the c12 directory. The following code is in a subdirectory called xfiles:
//: c12:xfiles:ThawAlien.java
// Try to recover a serialized file without the
// class of object that's stored in that file.
// {ThrowsException}
import java.io.*;

public class ThawAlien {
    public static void main(String[] args) throws Exception {
        ObjectInputStream in = new ObjectInputStream(
            new FileInputStream(new File("..", "X.file")));
        Object mystery = in.readObject();
        System.out.println(mystery.getClass());
    }
} ///:~
Even opening the file and reading in the object mystery requires the Class object for Alien; the JVM cannot find Alien.class (unless it happens to be in the Classpath, which it shouldn't be in this example). You'll get a ClassNotFoundException. (Once again, all evidence of alien life vanishes before proof of its existence can be verified!) The JVM must be able to find the associated .class file.
XII-K-2. Controlling serialization▲
As you can see, the default serialization mechanism is trivial to use. But what if you have special needs? Perhaps you have special security issues and you don't want to serialize portions of your object, or perhaps it just doesn't make sense for one subobject to be serialized if that part needs to be created anew when the object is recovered.
You can control the process of serialization by implementing the Externalizable interface instead of the Serializable interface. The Externalizable interface extends the Serializable interface and adds two methods, writeExternal( ) and readExternal( ), that are automatically called for your object during serialization and deserialization so that you can perform your special operations.
The following example shows simple implementations of the Externalizable interface methods. Note that Blip1 and Blip2 are nearly identical except for a subtle difference (see if you can discover it by looking at the code):
//: c12:Blips.java
// Simple use of Externalizable & a pitfall.
// {Clean: Blips.out}
import com.bruceeckel.simpletest.*;
import java.io.*;
import java.util.*;

class Blip1 implements Externalizable {
    public Blip1() {
        System.out.println("Blip1 Constructor");
    }
    public void writeExternal(ObjectOutput out)
            throws IOException {
        System.out.println("Blip1.writeExternal");
    }
    public void readExternal(ObjectInput in)
            throws IOException, ClassNotFoundException {
        System.out.println("Blip1.readExternal");
    }
}

class Blip2 implements Externalizable {
    Blip2() {
        System.out.println("Blip2 Constructor");
    }
    public void writeExternal(ObjectOutput out)
            throws IOException {
        System.out.println("Blip2.writeExternal");
    }
    public void readExternal(ObjectInput in)
            throws IOException, ClassNotFoundException {
        System.out.println("Blip2.readExternal");
    }
}

public class Blips {
    private static Test monitor = new Test();
    // Throw exceptions to console:
    public static void main(String[] args)
            throws IOException, ClassNotFoundException {
        System.out.println("Constructing objects:");
        Blip1 b1 = new Blip1();
        Blip2 b2 = new Blip2();
        ObjectOutputStream o = new ObjectOutputStream(
            new FileOutputStream("Blips.out"));
        System.out.println("Saving objects:");
        o.writeObject(b1);
        o.writeObject(b2);
        o.close();
        // Now get them back:
        ObjectInputStream in = new ObjectInputStream(
            new FileInputStream("Blips.out"));
        System.out.println("Recovering b1:");
        b1 = (Blip1)in.readObject();
        // OOPS! Throws an exception:
//! System.out.println("Recovering b2:");
//! b2 = (Blip2)in.readObject();
        monitor.expect(new String[] {
            "Constructing objects:",
            "Blip1 Constructor",
            "Blip2 Constructor",
            "Saving objects:",
            "Blip1.writeExternal",
            "Blip2.writeExternal",
            "Recovering b1:",
            "Blip1 Constructor",
            "Blip1.readExternal"
        });
    }
} ///:~
The reason that the Blip2 object is not recovered is that trying to do so causes an exception. Can you see the difference between Blip1 and Blip2? The constructor for Blip1 is public, while the constructor for Blip2 is not, and that causes the exception upon recovery. Try making Blip2's constructor public and removing the //! comments to see the correct results.
When b1 is recovered, the Blip1 default constructor is called. This is different from recovering a Serializable object, in which the object is constructed entirely from its stored bits, with no constructor calls. With an Externalizable object, all the normal default construction behavior occurs (including the initializations at the point of field definition), and then readExternal( ) is called. You need to be aware of this-in particular, the fact that all the default construction always takes place-to produce the correct behavior in your Externalizable objects.
Here's an example that shows what you must do to fully store and retrieve an Externalizable object:
//: c12:Blip3.java
// Reconstructing an externalizable object.
import com.bruceeckel.simpletest.*;
import java.io.*;
import java.util.*;

public class Blip3 implements Externalizable {
    private static Test monitor = new Test();
    private int i;
    private String s; // No initialization
    public Blip3() {
        System.out.println("Blip3 Constructor");
        // s, i not initialized
    }
    public Blip3(String x, int a) {
        System.out.println("Blip3(String x, int a)");
        s = x;
        i = a;
        // s & i initialized only in nondefault constructor.
    }
    public String toString() { return s + i; }
    public void writeExternal(ObjectOutput out)
            throws IOException {
        System.out.println("Blip3.writeExternal");
        // You must do this:
        out.writeObject(s);
        out.writeInt(i);
    }
    public void readExternal(ObjectInput in)
            throws IOException, ClassNotFoundException {
        System.out.println("Blip3.readExternal");
        // You must do this:
        s = (String)in.readObject();
        i = in.readInt();
    }
    public static void main(String[] args)
            throws IOException, ClassNotFoundException {
        System.out.println("Constructing objects:");
        Blip3 b3 = new Blip3("A String ", 47);
        System.out.println(b3);
        ObjectOutputStream o = new ObjectOutputStream(
            new FileOutputStream("Blip3.out"));
        System.out.println("Saving object:");
        o.writeObject(b3);
        o.close();
        // Now get it back:
        ObjectInputStream in = new ObjectInputStream(
            new FileInputStream("Blip3.out"));
        System.out.println("Recovering b3:");
        b3 = (Blip3)in.readObject();
        System.out.println(b3);
        monitor.expect(new String[] {
            "Constructing objects:",
            "Blip3(String x, int a)",
            "A String 47",
            "Saving object:",
            "Blip3.writeExternal",
            "Recovering b3:",
            "Blip3 Constructor",
            "Blip3.readExternal",
            "A String 47"
        });
    }
} ///:~
The fields s and i are initialized only in the second constructor, but not in the default constructor. This means that if you don't initialize s and i in readExternal( ), s will be null and i will be zero (since the storage for the object gets wiped to zero in the first step of object creation). If you comment out the two lines of code following the phrases « You must do this » and run the program, you'll see that when the object is recovered, s is null and i is zero.
If you are inheriting from an Externalizable object, you'll typically call the base-class versions of writeExternal( ) and readExternal( ) to provide proper storage and retrieval of the base-class components.
So to make things work correctly you must not only write the important data from the object during the writeExternal( ) method (there is no default behavior that writes any of the member objects for an Externalizable object), but you must also recover that data in the readExternal( ) method. This can be a bit confusing at first because the default construction behavior for an Externalizable object can make it seem like some kind of storage and retrieval takes place automatically. It does not.
XII-K-2-a. The transient keyword▲
When you're controlling serialization, there might be a particular subobject that you don't want Java's serialization mechanism to automatically save and restore. This is commonly the case if that subobject represents sensitive information that you don't want to serialize, such as a password. Even if that information is private in the object, once it has been serialized, it's possible for someone to access it by reading a file or intercepting a network transmission.
One way to prevent sensitive parts of your object from being serialized is to implement your class as Externalizable, as shown previously. Then nothing is automatically serialized, and you can explicitly serialize only the necessary parts inside writeExternal( ).
If you're working with a Serializable object, however, all serialization happens automatically. To control this, you can turn off serialization on a field-by-field basis using the transient keyword, which says « Don't bother saving or restoring this-I'll take care of it. »
For example, consider a Login object that keeps information about a particular login session. Suppose that, once you verify the login, you want to store the data, but without the password. The easiest way to do this is by implementing Serializable and marking the password field as transient. Here's what it looks like:
//: c12:Logon.java
// Demonstrates the "transient" keyword.
// {Clean: Logon.out}
import java.io.*;
import java.util.*;

public class Logon implements Serializable {
    private Date date = new Date();
    private String username;
    private transient String password;
    public Logon(String name, String pwd) {
        username = name;
        password = pwd;
    }
    public String toString() {
        String pwd = (password == null) ? "(n/a)" : password;
        return "logon info: \n   username: " + username +
            "\n   date: " + date + "\n   password: " + pwd;
    }
    public static void main(String[] args) throws Exception {
        Logon a = new Logon("Hulk", "myLittlePony");
        System.out.println( "logon a = " + a);
        ObjectOutputStream o = new ObjectOutputStream(
            new FileOutputStream("Logon.out"));
        o.writeObject(a);
        o.close();
        Thread.sleep(1000); // Delay for 1 second
        // Now get them back:
        ObjectInputStream in = new ObjectInputStream(
            new FileInputStream("Logon.out"));
        System.out.println("Recovering object at "+new Date());
        a = (Logon)in.readObject();
        System.out.println("logon a = " + a);
    }
} ///:~
You can see that the date and username fields are ordinary (not transient), and thus are automatically serialized. However, the password is transient, so it is not stored to disk; also, the serialization mechanism makes no attempt to recover it. The output is:
logon a = logon info:
    username: Hulk
    date: Mon Oct 21 12:10:13 MDT 2002
    password: myLittlePony
Recovering object at Mon Oct 21 12:10:14 MDT 2002
logon a = logon info:
    username: Hulk
    date: Mon Oct 21 12:10:13 MDT 2002
    password: (n/a)
When the object is recovered, the password field is null. Note that toString( ) must check for a null value of password,because if you try to assemble a String object using the overloaded '+' operator, and that operator encounters a null reference, you'll get a NullPointerException. (Newer versions of Java might contain code to avoid this problem.)
You can also see that the date field is stored to and recovered from disk and not generated anew.
Since Externalizable objects do not store any of their fields by default, the transient keyword is for use with Serializable objects only.
XII-K-2-b. An alternative to Externalizable▲
If you're not keen on implementing the Externalizable interface, there's another approach. You can implement the Serializable interface and add (notice I say « add » and not « override » or « implement ») methods called writeObject( ) and readObject( ) that will automatically be called when the object is serialized and deserialized, respectively. That is, if you provide these two methods, they will be used instead of the default serialization.
The methods must have these exact signatures:
private void writeObject(ObjectOutputStream stream)
throws IOException;

private void readObject(ObjectInputStream stream)
throws IOException, ClassNotFoundException
From a design standpoint, things get really weird here. First of all, you might think that because these methods are not part of a base class or the Serializable interface, they ought to be defined in their own interface(s). But notice that they are defined as private, which means they are to be called only by other members of this class. However, you don't actually call them from other members of this class, but instead the writeObject( ) and readObject( ) methods of the ObjectOutputStream and ObjectInputStream objects call your object's writeObject( ) and readObject( ) methods. (Notice my tremendous restraint in not launching into a long diatribe about using the same method names here. In a word: confusing.) You might wonder how the ObjectOutputStream and ObjectInputStream objects have access to private methods of your class. We can only assume that this is part of the serialization magic.
In any event, anything defined in an interface is automatically public so if writeObject( ) and readObject( ) must be private, then they can't be part of an interface. Since you must follow the signatures exactly, the effect is the same as if you're implementing an interface.
It would appear that when you call ObjectOutputStream.writeObject( ), the Serializable object that you pass it to is interrogated (using reflection, no doubt) to see if it implements its own writeObject( ). If so, the normal serialization process is skipped and the writeObject( ) is called. The same sort of situation exists for readObject( ).
There's one other twist. Inside your writeObject( ), you can choose to perform the default writeObject( ) action by calling defaultWriteObject( ). Likewise, inside readObject( ) you can call defaultReadObject( ). Here is a simple example that demonstrates how you can control the storage and retrieval of a Serializable object:
//: c12:SerialCtl.java
// Controlling serialization by adding your own
// writeObject() and readObject() methods.
import com.bruceeckel.simpletest.*;
import java.io.*;

public class SerialCtl implements Serializable {
    private static Test monitor = new Test();
    private String a;
    private transient String b;
    public SerialCtl(String aa, String bb) {
        a = "Not Transient: " + aa;
        b = "Transient: " + bb;
    }
    public String toString() { return a + "\n" + b; }
    private void writeObject(ObjectOutputStream stream)
            throws IOException {
        stream.defaultWriteObject();
        stream.writeObject(b);
    }
    private void readObject(ObjectInputStream stream)
            throws IOException, ClassNotFoundException {
        stream.defaultReadObject();
        b = (String)stream.readObject();
    }
    public static void main(String[] args)
            throws IOException, ClassNotFoundException {
        SerialCtl sc = new SerialCtl("Test1", "Test2");
        System.out.println("Before:\n" + sc);
        ByteArrayOutputStream buf= new ByteArrayOutputStream();
        ObjectOutputStream o = new ObjectOutputStream(buf);
        o.writeObject(sc);
        // Now get it back:
        ObjectInputStream in = new ObjectInputStream(
            new ByteArrayInputStream(buf.toByteArray()));
        SerialCtl sc2 = (SerialCtl)in.readObject();
        System.out.println("After:\n" + sc2);
        monitor.expect(new String[] {
            "Before:",
            "Not Transient: Test1",
            "Transient: Test2",
            "After:",
            "Not Transient: Test1",
            "Transient: Test2"
        });
    }
} ///:~
In this example, one String field is ordinary and the other is transient, to prove that the non-transient field is saved by the defaultWriteObject( ) method and the transient field is saved and restored explicitly. The fields are initialized inside the constructor rather than at the point of definition to prove that they are not being initialized by some automatic mechanism during deserialization.
If you are going to use the default mechanism to write the non-transient parts of your object, you must call defaultWriteObject( ) as the first operation in writeObject( ), and defaultReadObject( ) as the first operation in readObject( ). These are strange method calls. It would appear, for example, that you are calling defaultWriteObject( ) for an ObjectOutputStream and passing it no arguments, and yet it somehow turns around and knows the reference to your object and how to write all the non-transient parts. Spooky.
The storage and retrieval of the transient objects uses more familiar code. And yet, think about what happens here. In main( ), a SerialCtl object is created, and then it's serialized to an ObjectOutputStream. (Notice in this case that a buffer is used instead of a file-it's all the same to the ObjectOutputStream.) The serialization occurs in the line:
o.writeObject(sc);The writeObject( ) method must be examining sc to see if it has its own writeObject( ) method. (Not by checking the interface-there isn't one-or the class type, but by actually hunting for the method using reflection.) If it does, it uses that. A similar approach holds true for readObject( ). Perhaps this was the only practical way that they could solve the problem, but it's certainly strange.
XII-K-2-c. Versioning▲
It's possible that you might want to change the version of a serializable class (objects of the original class might be stored in a database, for example). This is supported, but you'll probably do it only in special cases, and it requires an extra depth of understanding that we will not attempt to achieve here. The JDK documents downloadable from java.sun.com cover this topic quite thoroughly.
You will also notice in the JDK documentation many comments that begin with:
Warning: Serialized objects of this class will not be compatible with future Swing releases. The current serialization support is appropriate for short term storage or RMI between applications …
This is because the versioning mechanism is too simple to work reliably in all situations, especially with JavaBeans. They're working on a correction for the design, and that's what the warning is about.
XII-K-3. Using persistence▲
It's quite appealing to use serialization technology to store some of the state of your program so that you can easily restore the program to the current state later. But before you can do this, some questions must be answered. What happens if you serialize two objects that both have a reference to a third object? When you restore those two objects from their serialized state, do you get only one occurrence of the third object? What if you serialize your two objects to separate files and deserialize them in different parts of your code?
Here's an example that shows the problem:
//: c12:MyWorld.java
import java.io.*;
import java.util.*;

class House implements Serializable {}

class Animal implements Serializable {
    private String name;
    private House preferredHouse;
    Animal(String nm, House h) {
        name = nm;
        preferredHouse = h;
    }
    public String toString() {
        return name + "[" + super.toString() +
            "], " + preferredHouse + "\n";
    }
}

public class MyWorld {
    public static void main(String[] args)
            throws IOException, ClassNotFoundException {
        House house = new House();
        List animals = new ArrayList();
        animals.add(new Animal("Bosco the dog", house));
        animals.add(new Animal("Ralph the hamster", house));
        animals.add(new Animal("Fronk the cat", house));
        System.out.println("animals: " + animals);
        ByteArrayOutputStream buf1 =
            new ByteArrayOutputStream();
        ObjectOutputStream o1 = new ObjectOutputStream(buf1);
        o1.writeObject(animals);
        o1.writeObject(animals); // Write a 2nd set
        // Write to a different stream:
        ByteArrayOutputStream buf2 =
            new ByteArrayOutputStream();
        ObjectOutputStream o2 = new ObjectOutputStream(buf2);
        o2.writeObject(animals);
        // Now get them back:
        ObjectInputStream in1 = new ObjectInputStream(
            new ByteArrayInputStream(buf1.toByteArray()));
        ObjectInputStream in2 = new ObjectInputStream(
            new ByteArrayInputStream(buf2.toByteArray()));
        List
            animals1 = (List)in1.readObject(),
            animals2 = (List)in1.readObject(),
            animals3 = (List)in2.readObject();
        System.out.println("animals1: " + animals1);
        System.out.println("animals2: " + animals2);
        System.out.println("animals3: " + animals3);
    }
} ///:~
One thing that's interesting here is that it's possible to use object serialization to and from a byte array as a way of doing a « deep copy » of any object that's Serializable. (A deep copy means that you're duplicating the entire web of objects, rather than just the basic object and its references.) Object copying is covered in depth in Appendix A.
Animal objects contain fields of type House. In main( ), a List of these Animals is created and it is serialized twice to one stream and then again to a separate stream. When these are deserialized and printed, you see the following results for one run (the objects will be in different memory locations each run):
animals: [Bosco the dog[Animal@1cde100], House@16f0472
, Ralph the hamster[Animal@18d107f], House@16f0472
, Fronk the cat[Animal@360be0], House@16f0472
]
animals1: [Bosco the dog[Animal@e86da0], House@1754ad2
, Ralph the hamster[Animal@1833955], House@1754ad2
, Fronk the cat[Animal@291aff], House@1754ad2
]
animals2: [Bosco the dog[Animal@e86da0], House@1754ad2
, Ralph the hamster[Animal@1833955], House@1754ad2
, Fronk the cat[Animal@291aff], House@1754ad2
]
animals3: [Bosco the dog[Animal@ab95e6], House@fe64b9
, Ralph the hamster[Animal@186db54], House@fe64b9
, Fronk the cat[Animal@a97b0b], House@fe64b9
]
Of course you expect that the deserialized objects have different addresses from their originals. But notice that in animals1 and animals2, the same addresses appear, including the references to the House object that both share. On the other hand, when animals3 is recovered, the system has no way of knowing that the objects in this other stream are aliases of the objects in the first stream, so it makes a completely different web of objects.
As long as you're serializing everything to a single stream, you'll be able to recover the same web of objects that you wrote, with no accidental duplication of objects. Of course, you can change the state of your objects in between the time you write the first and the last, but that's your responsibility; the objects will be written in whatever state they are in (and with whatever connections they have to other objects) at the time you serialize them.
The safest thing to do if you want to save the state of a system is to serialize as an « atomic » operation. If you serialize some things, do some other work, and serialize some more, etc., then you will not be storing the system safely. Instead, put all the objects that comprise the state of your system in a single container and simply write that container out in one operation. Then you can restore it with a single method call as well.
The following example is an imaginary computer-aided design (CAD) system that demonstrates the approach. In addition, it throws in the issue of static fields; if you look at the JDK documentation you'll see that Class is Serializable, so it should be easy to store the static fields by simply serializing the Class object. That seems like a sensible approach, anyway.
//: c12:CADState.java
// Saving and restoring the state of a pretend CAD system.
// {Clean: CADState.out}
//package c12;
import java.io.*;
import java.util.*;

abstract class Shape implements Serializable {
    public static final int RED = 1, BLUE = 2, GREEN = 3;
    private int xPos, yPos, dimension;
    private static Random r = new Random();
    private static int counter = 0;
    public abstract void setColor(int newColor);
    public abstract int getColor();
    public Shape(int xVal, int yVal, int dim) {
        xPos = xVal;
        yPos = yVal;
        dimension = dim;
    }
    public String toString() {
        return getClass() +
            "color[" + getColor() + "] xPos[" + xPos +
            "] yPos[" + yPos + "] dim[" + dimension + "]\n";
    }
    public static Shape randomFactory() {
        int xVal = r.nextInt(100);
        int yVal = r.nextInt(100);
        int dim = r.nextInt(100);
        switch(counter++ % 3) {
            default:
            case 0: return new Circle(xVal, yVal, dim);
            case 1: return new Square(xVal, yVal, dim);
            case 2: return new Line(xVal, yVal, dim);
        }
    }
}

class Circle extends Shape {
    private static int color = RED;
    public Circle(int xVal, int yVal, int dim) {
        super(xVal, yVal, dim);
    }
    public void setColor(int newColor) { color = newColor; }
    public int getColor() { return color; }
}

class Square extends Shape {
    private static int color;
    public Square(int xVal, int yVal, int dim) {
        super(xVal, yVal, dim);
        color = RED;
    }
    public void setColor(int newColor) { color = newColor; }
    public int getColor() { return color; }
}

class Line extends Shape {
    private static int color = RED;
    public static void
    serializeStaticState(ObjectOutputStream os)
    throws IOException { os.writeInt(color); }
    public static void
    deserializeStaticState(ObjectInputStream os)
    throws IOException { color = os.readInt(); }
    public Line(int xVal, int yVal, int dim) {
        super(xVal, yVal, dim);
    }
    public void setColor(int newColor) { color = newColor; }
    public int getColor() { return color; }
}

public class CADState {
    public static void main(String[] args) throws Exception {
        List shapeTypes, shapes;
        if(args.length == 0) {
            shapeTypes = new ArrayList();
            shapes = new ArrayList();
            // Add references to the class objects:
            shapeTypes.add(Circle.class);
            shapeTypes.add(Square.class);
            shapeTypes.add(Line.class);
            // Make some shapes:
            for(int i = 0; i < 10; i++)
                shapes.add(Shape.randomFactory());
            // Set all the static colors to GREEN:
            for(int i = 0; i < 10; i++)
                ((Shape)shapes.get(i)).setColor(Shape.GREEN);
            // Save the state vector:
            ObjectOutputStream out = new ObjectOutputStream(
                new FileOutputStream("CADState.out"));
            out.writeObject(shapeTypes);
            Line.serializeStaticState(out);
            out.writeObject(shapes);
        } else { // There's a command-line argument
            ObjectInputStream in = new ObjectInputStream(
                new FileInputStream(args[0]));
            // Read in the same order they were written:
            shapeTypes = (List)in.readObject();
            Line.deserializeStaticState(in);
            shapes = (List)in.readObject();
        }
        // Display the shapes:
        System.out.println(shapes);
    }
} ///:~
The Shape class implements Serializable, so anything that is inherited from Shape is automatically Serializable as well. Each Shape contains data, and each derived Shape class contains a static field that determines the color of all of those types of Shapes. (Placing a static field in the base class would result in only one field, since static fields are not duplicated in derived classes.) Methods in the base class can be overridden to set the color for the various types (static methods are not dynamically bound, so these are normal methods). The randomFactory( ) method creates a different Shape each time you call it, using random values for the Shape data.
Circle and Square are straightforward extensions of Shape; the only difference is that Circle initializes color at the point of definition and Square initializes it in the constructor. We'll leave the discussion of Line for later.
In main( ), one ArrayList is used to hold the Class objects and the other to hold the shapes. If you don't provide a command-line argument, the shapeTypes ArrayList is created and the Class objects are added, and then the shapes ArrayList is created and Shape objects are added. Next, all the static color values are set to GREEN, and everything is serialized to the file CADState.out.
If you provide a command-line argument (presumably CADState.out), that file is opened and used to restore the state of the program. In both situations, the resulting ArrayList of Shapes is printed. The results from one run are:
$ java CADState
[class Circlecolor[3] xPos[71] yPos[82] dim[44]
, class Squarecolor[3] xPos[98] yPos[21] dim[49]
, class Linecolor[3] xPos[16] yPos[80] dim[37]
, class Circlecolor[3] xPos[51] yPos[74] dim[7]
, class Squarecolor[3] xPos[7] yPos[78] dim[98]
, class Linecolor[3] xPos[38] yPos[79] dim[93]
, class Circlecolor[3] xPos[84] yPos[12] dim[62]
, class Squarecolor[3] xPos[16] yPos[51] dim[94]
, class Linecolor[3] xPos[51] yPos[0] dim[73]
, class Circlecolor[3] xPos[47] yPos[6] dim[49]
]

$ java CADState CADState.out
[class Circlecolor[1] xPos[71] yPos[82] dim[44]
, class Squarecolor[0] xPos[98] yPos[21] dim[49]
, class Linecolor[3] xPos[16] yPos[80] dim[37]
, class Circlecolor[1] xPos[51] yPos[74] dim[7]
, class Squarecolor[0] xPos[7] yPos[78] dim[98]
, class Linecolor[3] xPos[38] yPos[79] dim[93]
, class Circlecolor[1] xPos[84] yPos[12] dim[62]
, class Squarecolor[0] xPos[16] yPos[51] dim[94]
, class Linecolor[3] xPos[51] yPos[0] dim[73]
, class Circlecolor[1] xPos[47] yPos[6] dim[49]
]
You can see that the values of xPos, yPos, and dim were all stored and recovered successfully, but there's something wrong with the retrieval of the static information. It's all « 3 » going in, but it doesn't come out that way. Circles have a value of 1 (RED, which is the definition), and Squares have a value of 0 (remember, they are initialized in the constructor). It's as if the statics didn't get serialized at all! That's right-even though class Class is Serializable, it doesn't do what you expect. So if you want to serialize statics, you must do it yourself.
This is what the serializeStaticState( ) and deserializeStaticState( ) static methods in Line are for. You can see that they are explicitly called as part of the storage and retrieval process. (Note that the order of writing to the serialize file and reading back from it must be maintained.) Thus to make CADState.java run correctly, you must:
- Add a serializeStaticState( ) and deserializeStaticState( ) to the shapes.
- Remove the ArrayList shapeTypes and all code related to it.
- Add calls to the new serialize and deserialize static methods in the shapes.
Another issue you might have to think about is security, since serialization also saves private data. If you have a security issue, those fields should be marked as transient. But then you have to design a secure way to store that information so that when you do a restore you can reset those private variables.
XII-L. Preferences▲
JDK 1.4 introduced the Preferences API, which is much closer to persistence than object serialization because it automatically stores and retrieves your information. However, its use is restricted to small and limited data sets-you can only hold primitives and Strings, and the length of each stored String can't be longer than 8K (not tiny, but you don't want to build anything serious with it, either). As the name suggests, the Preferences API is designed to store and retrieve user preferences and program-configuration settings.
Preferences are key-value sets (like Maps) stored in a hierarchy of nodes. Although the node hierarchy can be used to create complicated structures, it's typical to create a single node named after your class and store the information there. Here's a simple example:
//: c12:PreferencesDemo.java
import java.util.prefs.*;
import java.util.*;

public class PreferencesDemo {
    public static void main(String[] args) throws Exception {
        Preferences prefs = Preferences
            .userNodeForPackage(PreferencesDemo.class);
        prefs.put("Location", "Oz");
        prefs.put("Footwear", "Ruby Slippers");
        prefs.putInt("Companions", 4);
        prefs.putBoolean("Are there witches?", true);
        int usageCount = prefs.getInt("UsageCount", 0);
        usageCount++;
        prefs.putInt("UsageCount", usageCount);
        Iterator it = Arrays.asList(prefs.keys()).iterator();
        while(it.hasNext()) {
            String key = it.next().toString();
            System.out.println(key + ": "+ prefs.get(key, null));
        }
        // You must always provide a default value:
        System.out.println(
            "How many companions does Dorothy have? " +
            prefs.getInt("Companions", 0));
    }
} ///:~
Here, userNodeForPackage( ) is used, but you could also choose systemNodeForPackage( ); the choice is somewhat arbitrary, but the idea is that « user » is for individual user preferences, and « system » is for general installation configuration. Since main( ) is static, PreferencesDemo.class is used to identify the node, but inside a non-static method, you'll usually use getClass( ). You don't need to use the current class as the node identifier, but that's the usual practice.
Once you create the node, it's available for either loading or reading data. This example loads the node with various types of items and then gets the keys( ). These come back as a String[], which you might not expect if you're used to keys( ) in the collections library. Here, they're converted to a List that is used to produce an Iterator for printing the keys and values. Notice the second argument to get( ). This is the default value that is produced if there isn't any entry for that key value. While iterating through a set of keys, you always know there's an entry, so using null as the default is safe, but normally you'll be fetching a named key, as in:
prefs.getInt("Companions", 0));In the normal case, you'll want to provide a reasonable default value. In fact, a typical idiom is seen in the lines:
int usageCount = prefs.getInt("UsageCount", 0);
usageCount++;
prefs.putInt("UsageCount", usageCount);
This way, the first time you run the program, the UsageCount will be zero, but on subsequent invocations it will be nonzero.
When you run PreferencesDemo.java you'll see that the UsageCount does indeed increment every time you run the program, but where is the data stored? There's no local file that appears after the program is run the first time. The Preferences API uses appropriate system resources to accomplish its task, and these will vary depending on the OS. In Windows, the registry is used (since it's already a hierarchy of nodes with key-value pairs). But the whole point is that the information is magically stored for you so that you don't have to worry about how it works from one system to another.
There's more to the Preferences API than shown here. Consult the JDK documentation, which is fairly understandable, for further details.
XII-M. Regular expressions▲
To finish this chapter, we'll look at regular expressions, which were added in JDK 1.4 but have been integral to standard Unix utilities like sed and awk, and languages like Python and Perl (some would argue that they are predominant reason for Perl's success). Technically, these are string manipulation tools (previously delegated to the String, StringBuffer, and StringTokenizer classes in Java), but they are typically used in conjunction with I/O, so it's not too far-fetched to include them here. (66)
Regular expressions are powerful and flexible text-processing tools. They allow you to specify, programmatically, complex patterns of text that can be discovered in an input string. Once you discover these patterns, you can then react to them any way you want. Although the syntax of regular expressions can be intimidating at first, they provide a compact and dynamic language that can be employed to solve all sorts of string processing, matching and selection, editing, and verification problems in a completely general way.
XII-M-1. Creating regular expressions▲
You can begin learning regular expressions with a useful subset of the possible constructs. A complete list of constructs for building regular expressions can be found in the javadocs for the Pattern class for package java.util.regex.
|
Characters |
|
|---|---|
|
B |
The specific character B |
|
\xhh |
Character with hex value 0xhh |
|
\uhhhh |
The Unicode character with hex representation 0xhhhh |
|
\t |
Tab |
|
\n |
Newline |
|
\r |
Carriage return |
|
\f |
Form feed |
|
\e |
Escape |
The power of regular expressions begins to appear when defining character classes. Here are some typical ways to create character classes, and some predefined classes:
|
Character Classes |
|
|---|---|
|
. |
Represents any character |
|
[abc] |
Any of the characters a, b, or c (same as a|b|c) |
|
[^abc] |
Any character except a, b, and c (negation) |
|
[a-zA-Z] |
Any character a through z or A through Z (range) |
|
[abc[hij]] |
Any of a,b,c,h,i,j (same as a|b|c|h|i|j) (union) |
|
[a-z&&[hij]] |
Either h, i, or j (intersection) |
|
\s |
A whitespace character (space, tab, newline, formfeed, carriage return) |
|
\S |
À non-whitespace character ([^\s]) |
|
\d |
À numeric digit [0-9] |
|
\D |
À non-digit [^0-9] |
|
\w |
À word character [a-zA-Z_0-9] |
|
\W |
À non-word character [^\w] |
If you have any experience with regular expressions in other languages, you'll immediately notice a difference in the way backslashes are handled. In other languages, « \\ » means « I want to insert a plain old (literal) backslash in the regular expression. Don't give it any special meaning. » In Java, « \\ » means « I'm inserting a regular expression backslash, so the following character has special meaning. » For example, if you want to indicate one or more word characters, your regular expression string will be « \\w+ ». If you want to insert a literal backslash, you say « \\\\ ». However, things like newlines and tabs just use a single backslash: «
\t ».
What's shown here is only a sampling; you'll want to have the java.util.regex.Pattern JDK documentation page bookmarked or on your "Start" menu so you can easily access all the possible regular expression patterns.
|
Logical Operators |
|
|---|---|
|
XY |
X followed by Y |
|
X|Y |
X or Y |
|
(X) |
À capturing group. You can refer to the ithcaptured group later in the expression with \i |
|
Boundary Matchers |
|
|---|---|
|
^ |
Beginning of a line |
|
$ |
End of a line |
|
\b |
Word boundary |
|
\B |
Non-word boundary |
|
\G |
End of the previous match |
As an example, each of the following represent valid regular expressions, and all will successfully match the character sequence "Rudolph":
Rudolph
[rR]udolph
[rR][aeiou][a-z]ol.*
R.*
XII-M-2. Quantifiers▲
A quantifier describes the way that a pattern absorbs input text:
- Greedy: Quantifiers are greedy unless otherwise altered. A greedy expression finds as many possible matches for the pattern as possible. A typical cause of problems is to assume that your pattern will only match the first possible group of characters, when it's actually greedy and will keep going.
- Reluctant: Specified with a question mark, this quantifier matches the minimum necessary number of characters to satisfy the pattern. Also called lazy, minimal matching, non-greedy,or ungreedy.
- Possessive: Currently only available in Java (not in other languages), and it is more advanced, so you probably won't use it right away. As a regular expression is applied to a string, it generates many states so that it can backtrack if the match fails. Possessive quantifiers do not keep those intermediate states, and thus prevent backtracking. They can be used to prevent a regular expression from running away and also to make it execute more efficiently.
|
Greedy |
Reluctant |
Possessive |
Matches |
|---|---|---|---|
|
X? |
X?? |
X?+ |
X, one or none |
|
X* |
X*? |
X*+ |
X, zero or more |
|
X+ |
X+? |
X++ |
X, one or more |
|
X{n} |
X{n}? |
X{n}+ |
X, exactly n times |
|
X{n,} |
X{n,}? |
X{n,}+ |
X, at least n times |
|
X{n,m} |
X{n,m}? |
X{n,m}+ |
X, at least n but not more than m times |
You should be very aware that the expression 'X' will often need to be surrounded in parentheses for it to work the way you desire. For example:
abc+Might seem like it would match the sequence 'abc' one or more times, and if you apply it to the input string 'abcabcabc', you will in fact get three matches. However, the expression actually says "match 'ab' followed by one or more occurrences of 'c'." To match the entire string 'abc' one or more times, you must say:
(abc)+You can easily be fooled when using regular expressions; it's a new language, on top of Java.
XII-M-2-a. CharSequence▲
JDK 1.4 defines a new interface called CharSequence, which establishes a definition of a character sequence abstracted from the String or StringBuffer classes:
interface CharSequence {
    charAt(int i);
    length();
    subSequence(int start, int end);
    toString();
}
The String, StringBuffer, and CharBuffer classes have been modified to implement this new CharSequence interface. Many regular expression operations take CharSequence arguments.
XII-M-3. Pattern and Matcher▲
As a first example, the following class can be used to test regular expressions against an input string. The first argument is the input string to match against, followed by one or more regular expressions to be applied to the input. Under Unix/Linux, the regular expressions must be quoted on the command line.
This program can be useful in testing regular expressions as you construct them to see that they produce your intended matching behavior.
//: c12:TestRegularExpression.java
// Allows you to easly try out regular expressions.
// {Args: abcabcabcdefabc "abc+" "(abc)+" "(abc){2,}" }
import java.util.regex.*;

public class TestRegularExpression {
    public static void main(String[] args) {
        if(args.length < 2) {
            System.out.println("Usage:\n" +
                "java TestRegularExpression " +
                "characterSequence regularExpression+");
            System.exit(0);
        }
        System.out.println("Input: \"" + args[0] + "\"");
        for(int i = 1; i < args.length; i++) {
            System.out.println(
                "Regular expression: \"" + args[i] + "\"");
            Pattern p = Pattern.compile(args[i]);
            Matcher m = p.matcher(args[0]);
            while(m.find()) {
                System.out.println("Match \"" + m.group() +
                    "\" at positions " +
                    m.start() + "-" + (m.end() - 1));
            }
        }
    }
} ///:~
Regular expressions are implemented in Java through the Pattern and Matcher classes in the package java.util.regex. A Pattern object represents a compiled version of a regular expression. The static compile( ) method compiles a regular expression string into a Pattern object. As seen in the preceding example, you can use the matcher( ) method and the input string to produce a Matcher object from the compiled Pattern object. Pattern also has a
static boolean ( regex, input)for quickly discerning if regex can be found in input, and a split( ) method that produces an array of String that has been broken around matches of the regex.
A Matcher object is generated by calling Pattern.matcher( ) with the input string as an argument. The Matcher object is then used to access the results, using methods to evaluate the success or failure of different types of matches:
boolean matches()
boolean lookingAt()
boolean find()
boolean find(int start)
The matches( ) method is successful if the pattern matches the entire input string, while lookingAt( ) is successful if the input string, starting at the beginning, is a match to the pattern.
XII-M-3-a. find( )▲
Matcher.find( ) can be used to discover multiple pattern matches in the CharSequence to which it is applied. For example:
//: c12:FindDemo.java
import java.util.regex.*;
import com.bruceeckel.simpletest.*;
import java.util.*;

public class FindDemo {
    private static Test monitor = new Test();
    public static void main(String[] args) {
        Matcher m = Pattern.compile("\\w+")
            .matcher("Evening is full of the linnet's wings");
        while(m.find())
            System.out.println(m.group());
        int i = 0;
        while(m.find(i)) {
            System.out.print(m.group() + " ");
            i++;
        }
        monitor.expect(new String[] {
            "Evening",
            "is",
            "full",
            "of",
            "the",
            "linnet",
            "s",
            "wings",
            "Evening vening ening ning ing ng g is is s full " +
            "full ull ll l of of f the the he e linnet linnet " +
            "innet nnet net et t s s wings wings ings ngs gs s "
        });
    }
} ///:~
The pattern "\\w+" indicates "one or more word characters," so it will simply split up the input into words. find( ) is like an iterator, moving forward through the input string. However, the second version of find( ) can be given an integer argument that tells it the character position for the beginning of the search-this version resets the search position to the value of the argument, as you can see from the output.
XII-M-3-b. Groups▲
Groups are regular expressions set off by parentheses that can be called up later with their group number. Group zero indicates the whole expression match, group one is the first parenthesized group, etc. Thus in
À(B(C))Dthere are three groups: Group 0 is ABCD, group 1 is BC, and group 2 is C.
The Matcher object has methods to give you information about groups:
public int groupCount( ) returns the number of groups in this matcher's pattern. Group zero is not included in this count.
public String group( ) returns group zero (the entire match) from the previous match operation (find( ), for example).
public String group(int i) returns the given group number during the previous match operation. If the match was successful, but the group specified failed to match any part of the input string, then null is returned.
public int start(int group) returns the start index of the group found in the previous match operation.
public int end(int group) returns the index of the last character, plus one, of the group found in the previous match operation.
Here's an example of regular expression groups:
//: c12:Groups.java
import java.util.regex.*;
import com.bruceeckel.simpletest.*;

public class Groups {
    private static Test monitor = new Test();
    static public final String poem =
        "Twas brillig, and the slithy toves\n" +
        "Did gyre and gimble in the wabe.\n" +
        "All mimsy were the borogoves,\n" +
        "And the mome raths outgrabe.\n\n" +
        "Beware the Jabberwock, my son,\n" +
        "The jaws that bite, the claws that catch.\n" +
        "Beware the Jubjub bird, and shun\n" +
        "The frumious Bandersnatch.";
    public static void main(String[] args) {
        Matcher m =
            Pattern.compile("(?m)(\\S+)\\s+((\\S+)\\s+(\\S+))$")
                .matcher(poem);
        while(m.find()) {
            for(int j = 0; j <= m.groupCount(); j++)
                System.out.print("[" + m.group(j) + "]");
            System.out.println();
        }
        monitor.expect(new String[]{
            "[the slithy toves]" +
            "[the][slithy toves][slithy][toves]",
            "[in the wabe.][in][the wabe.][the][wabe.]",
            "[were the borogoves,]" +
            "[were][the borogoves,][the][borogoves,]",
            "[mome raths outgrabe.]" +
            "[mome][raths outgrabe.][raths][outgrabe.]",
            "[Jabberwock, my son,]" +
            "[Jabberwock,][my son,][my][son,]",
            "[claws that catch.]" +
            "[claws][that catch.][that][catch.]",
            "[bird, and shun][bird,][and shun][and][shun]",
            "[The frumious Bandersnatch.][The]" +
            "[frumious Bandersnatch.][frumious][Bandersnatch.]"
        });
    }
} ///:~
The poem is the first part of Lewis Carroll's "Jabberwocky," from Through the Looking Glass. You can see that the regular expression pattern has a number of parenthesized groups, consisting of any number of non-whitespace characters ('\S+') followed by any number of whitespace characters ('\s+'). The goal is to capture the last three words on each line; the end of a line is delimited by '$'. However, the normal behavior is to match '$' with the end of the entire input sequence, so we must explicitly tell the regular expression to pay attention to newlines within the input. This is accomplished with the '(?m)' pattern flag at the beginning of the sequence (pattern flags will be shown shortly).
XII-M-3-c. start( ) and end( )▲
Following a successful matching operation, start( ) returns the start index of the previous match, and end( ) returns the index of the last character matched, plus one. Invoking either start( ) or end( ) following an unsuccessful matching operation (or prior to a matching operation being attempted) produces an IllegalStateException. The following program also demonstrates matches( ) and lookingAt( ):
//: c12:StartEnd.java
import java.util.regex.*;
import com.bruceeckel.simpletest.*;

public class StartEnd {
    private static Test monitor = new Test();
    public static void main(String[] args) {
        String[] input = new String[] {
            "Java has regular expressions in 1.4",
            "regular expressions now expressing in Java",
            "Java represses oracular expressions"
        };
        Pattern
            p1 = Pattern.compile("re\\w*"),
            p2 = Pattern.compile("Java.*");
        for(int i = 0; i < input.length; i++) {
            System.out.println("input " + i + ": " + input[i]);
            Matcher
                m1 = p1.matcher(input[i]),
                m2 = p2.matcher(input[i]);
            while(m1.find())
                System.out.println("m1.find() '" + m1.group() +
                    "' start = "+ m1.start() + " end = " + m1.end());
            while(m2.find())
                System.out.println("m2.find() '" + m2.group() +
                    "' start = "+ m2.start() + " end = " + m2.end());
            if(m1.lookingAt()) // No reset() necessary
                System.out.println("m1.lookingAt() start = "
                    + m1.start() + " end = " + m1.end());
            if(m2.lookingAt())
                System.out.println("m2.lookingAt() start = "
                    + m2.start() + " end = " + m2.end());
            if(m1.matches()) // No reset() necessary
                System.out.println("m1.matches() start = "
                    + m1.start() + " end = " + m1.end());
            if(m2.matches())
                System.out.println("m2.matches() start = "
                    + m2.start() + " end = " + m2.end());
        }
        monitor.expect(new String[] {
            "input 0: Java has regular expressions in 1.4",
            "m1.find() 'regular' start = 9 end = 16",
            "m1.find() 'ressions' start = 20 end = 28",
            "m2.find() 'Java has regular expressions in 1.4'" +
            " start = 0 end = 35",
            "m2.lookingAt() start = 0 end = 35",
            "m2.matches() start = 0 end = 35",
            "input 1: regular expressions now " +
            "expressing in Java",
            "m1.find() 'regular' start = 0 end = 7",
            "m1.find() 'ressions' start = 11 end = 19",
            "m1.find() 'ressing' start = 27 end = 34",
            "m2.find() 'Java' start = 38 end = 42",
            "m1.lookingAt() start = 0 end = 7",
            "input 2: Java represses oracular expressions",
            "m1.find() 'represses' start = 5 end = 14",
            "m1.find() 'ressions' start = 27 end = 35",
            "m2.find() 'Java represses oracular expressions' " +
            "start = 0 end = 35",
            "m2.lookingAt() start = 0 end = 35",
            "m2.matches() start = 0 end = 35"
        });
    }
} ///:~
Notice that find( ) will locate the regular expression anywhere in the input, but lookingAt( ) and matches( ) only succeed if the regular expression starts matching at the very beginning of the input. While matches( ) only succeeds if the entire input matches the regular expression, lookingAt( )(67) succeeds if only the first part of the input matches.
XII-M-3-d. Pattern flags▲
An alternative compile( ) method accepts flags that affect the behavior of regular expression matching:
Pattern Pattern.compile(String regex, int flag)where flag is drawn from among the following Pattern class constants:
|
Compile Flag |
Effect |
|---|---|
|
Pattern.CANON_EQ |
Two characters will be considered to match if, and only if, their full canonical decompositions match. The expression "a\u030A", for example, will match the string "?" when this flag is specified. By default, matching does not take canonical equivalence into account. |
|
Pattern.CASE_INSENSITIVE |
By default, case-insensitive matching assumes that only characters in the US-ASCII character set are being matched. This flag allows your pattern to match without regard to case (upper or lower). Unicode-aware case-insensitive matching can be enabled by specifying the UNICODE_CASE flag in conjunction with this flag. |
|
Pattern.COMMENTS |
In this mode, whitespace is ignored, and embedded comments starting with # are ignored until the end of a line. Unix lines mode can also be enabled via the embedded flag expression. |
|
Pattern.DOTALL |
In dotall mode, the expression '.' matches any character, including a line terminator. By default, the '.' expression does not match line terminators. |
|
Pattern.MULTILINE |
In multiline mode, the expressions '^' and '$' match the beginning and ending of a line, respectively. '^' also matches the beginning of the input string, and '$' also matches the end of the input string. By default, these expressions only match at the beginning and the end of the entire input string. |
|
Pattern.UNICODE_CASE |
When this flag is specified, case-insensitive matching, when enabled by the CASE_INSENSITIVE flag, is done in a manner consistent with the Unicode Standard. By default, case-insensitive matching assumes that only characters in the US-ASCII character set are being matched. |
|
Pattern.UNIX_LINES |
In this mode, only the '\n' line terminator is recognized in the behavior of '.', '^', and '$'. |
Particularly useful among these flags are Pattern.CASE_INSENSITIVE, Pattern.MULTILINE, and Pattern.COMMENTS (which is helpful for clarity and/or documentation). Note that the behavior of most of the flags can also be obtained by inserting the parenthesized characters, shown in the table beneath the flags, into your regular expression preceding the place where you want the mode to take effect.
You can combine the effect of these and other flags through an "OR" ('|') operation:
//: c12:ReFlags.java
import java.util.regex.*;
import com.bruceeckel.simpletest.*;

public class ReFlags {
    private static Test monitor = new Test();
    public static void main(String[] args) {
        Pattern p =  Pattern.compile("^java",
            Pattern.CASE_INSENSITIVE | Pattern.MULTILINE);
        Matcher m = p.matcher(
            "java has regex\nJava has regex\n" +
            "JAVA has pretty good regular expressions\n" +
            "Regular expressions are in Java");
        while(m.find())
            System.out.println(m.group());
        monitor.expect(new String[] {
            "java",
            "Java",
            "JAVA"
        });
    }
} ///:~
This creates a pattern that will match lines starting with "java," "Java," "JAVA," etc., and attempt a match for each line within a multiline set (matches starting at the beginning of the character sequence and following each line terminator within the character sequence). Note that the group( ) method only produces the matched portion.
XII-M-4. split( )▲
Splitting divides an input string into an array of String objects, delimited by the regular expression.
String[] split(CharSequence charseq)
String[] split(CharSequence charseq, int limit)
This is a quick and handy way of breaking up input text over a common boundary:
//: c12:SplitDemo.java
import java.util.regex.*;
import com.bruceeckel.simpletest.*;
import java.util.*;

public class SplitDemo {
    private static Test monitor = new Test();
    public static void main(String[] args) {
        String input =
            "This!!unusual use!!of exclamation!!points";
        System.out.println(Arrays.asList(
            Pattern.compile("!!").split(input)));
        // Only do the first three:
        System.out.println(Arrays.asList(
            Pattern.compile("!!").split(input, 3)));
        System.out.println(Arrays.asList(
            "Aha! String has a split() built in!".split(" ")));
        monitor.expect(new String[] {
            "[This, unusual use, of exclamation, points]",
            "[This, unusual use, of exclamation!!points]",
            "[Aha!, String, has, a, split(), built, in!]"
        });
    }
} ///:~
The second form of split( ) limits the number of splits that occur.
Notice that regular expressions are so valuable that some operations have also been added to the String class, including split( ) (shown here), matches( ), replaceFirst( ), and replaceAll( ). These behave like their Pattern and Matcher counterparts.
XII-M-5. Replace operations▲
Regular expressions become especially useful when you begin replacing text. Here are the available methods:
replaceFirst(String replacement) replaces the first matching part of the input string with replacement.
replaceAll(String replacement) replaces every matching part of the input string with replacement.
appendReplacement(StringBuffer sbuf, String replacement) performs step-by-step replacements into sbuf, rather than replacing only the first one or all of them, as in replaceFirst( ) and replaceAll( ), respectively. This is a very important method, because it allows you to call methods and perform other processing in order to produce replacement (replaceFirst( ) and replaceAll( ) are only able to put in fixed strings). With this method, you can programmatically pick apart the groups and create powerful replacements.
appendTail(StringBuffer sbuf, String replacement) is invoked after one or more invocations of the appendReplacement( ) method in order to copy the remainder of the input string.
Here's an example that shows the use of all the replace operations. In addition, the block of commented text at the beginning is extracted and processed with regular expressions for use as input in the rest of the example:
//: c12:TheReplacements.java
import java.util.regex.*;
import java.io.*;
import com.bruceeckel.util.*;
import com.bruceeckel.simpletest.*;

/*! Here's a block of text to use as input to
    the regular expression matcher. Note that we'll
    first extract the block of text by looking for
    the special delimiters, then process the
    extracted block. !*/

public class TheReplacements {
    private static Test monitor = new Test();
    public static void main(String[] args) throws Exception {
        String s = TextFile.read("TheReplacements.java");
        // Match the specially-commented block of text above:
        Matcher mInput =
            Pattern.compile("/\\*!(.*)!\\*/", Pattern.DOTALL)
                .matcher(s);
        if(mInput.find())
            s = mInput.group(1); // Captured by parentheses
        // Replace two or more spaces with a single space:
        s = s.replaceAll(" {2,}", " ");
        // Replace one or more spaces at the beginning of each
        // line with no spaces. Must enable MULTILINE mode:
        s = s.replaceAll("(?m)^ +", "");
        System.out.println(s);
        s = s.replaceFirst("[aeiou]", "(VOWEL1)");
        StringBuffer sbuf = new StringBuffer();
        Pattern p = Pattern.compile("[aeiou]");
        Matcher m = p.matcher(s);
        // Process the find information as you
        // perform the replacements:
        while(m.find())
            m.appendReplacement(sbuf, m.group().toUpperCase());
        // Put in the remainder of the text:
        m.appendTail(sbuf);
        System.out.println(sbuf);
        monitor.expect(new String[]{
            "Here's a block of text to use as input to",
            "the regular expression matcher. Note that we'll",
            "first extract the block of text by looking for",
            "the special delimiters, then process the",
            "extracted block. ",
            "H(VOWEL1)rE's A blOck Of tExt tO UsE As InpUt tO",
            "thE rEgUlAr ExprEssIOn mAtchEr. NOtE thAt wE'll",
            "fIrst ExtrAct thE blOck Of tExt by lOOkIng fOr",
            "thE spEcIAl dElImItErs, thEn prOcEss thE",
            "ExtrActEd blOck. "
        });
    }
} ///:~
The file is opened and read using the TextFile.read( ) method introduced earlier in this chapter. mInput is created to match all the text (notice the grouping parentheses) between '/*!' and '!*/'. Then, more than two spaces are reduced to a single space, and any space at the beginning of each line is removed (in order to do this on all lines and not just the beginning of the input, multiline mode must be enabled). These two replacements are performed with the equivalent (but more convenient, in this case) replaceAll( ) that's part of String. Note that since each replacement is only used once in the program, there's no extra cost to doing it this way rather than precompiling it as a Pattern.
replaceFirst( ) only performs the first replacement that it finds. In addition, the replacement strings in replaceFirst( ) and replaceAll( ) are just literals, so if you want to perform some processing on each replacement they don't help. In that case, you need to use appendReplacement( ), which allows you to write any amount of code in the process of performing the replacement. In the preceding example, a group( ) is selected and processed-in this situation, setting the vowel found by the regular expression to upper case-as the resulting sbuf is being built. Normally, you would step through and perform all the replacements and then call appendTail( ), but if you wanted to simulate replaceFirst( ) (or "replace n"), you would just do the replacement one time and then call appendTail( ) to put the rest into sbuf.
appendReplacement( ) also allows you to refer to captured groups directly in the replacement string by saying "$g" where 'g' is the group number. However, this is for simpler processing and wouldn't give you the desired results in the preceding program.
XII-M-6. reset( )▲
An existing Matcher object can be applied to a new character sequence Using the reset( ) methods:
//: c12:Resetting.java
import java.util.regex.*;
import java.io.*;
import com.bruceeckel.simpletest.*;

public class Resetting {
    private static Test monitor = new Test();
    public static void main(String[] args) throws Exception {
        Matcher m = Pattern.compile("[frb][aiu][gx]")
            .matcher("fix the rug with bags");
        while(m.find())
            System.out.println(m.group());
        m.reset("fix the rig with rags");
        while(m.find())
            System.out.println(m.group());
        monitor.expect(new String[]{
            "fix",
            "rug",
            "bag",
            "fix",
            "rig",
            "rag"
        });
    }
} ///:~
reset( ) without any arguments sets the Matcher to the beginning of the current sequence.
XII-M-7. Regular expressions and Java I/O▲
Most of the examples so far have shown regular expressions applied to static strings. The following example shows one way to apply regular expressions to search for matches in a file. Inspired by Unix's grep, JGrep.java takes two arguments: a filename and the regular expression that you want to match. The output shows each line where a match occurs and the match position(s) within the line.
//: c12:JGrep.java
// A very simple version of the "grep" program.
// {Args: JGrep.java "\\b[Ssct]\\w+"}
import java.io.*;
import java.util.regex.*;
import java.util.*;
import com.bruceeckel.util.*;

public class JGrep {
    public static void main(String[] args) throws Exception {
        if(args.length < 2) {
            System.out.println("Usage: java JGrep file regex");
            System.exit(0);
        }
        Pattern p = Pattern.compile(args[1]);
        // Iterate through the lines of the input file:
        ListIterator it = new TextFile(args[0]).listIterator();
        while(it.hasNext()) {
            Matcher m = p.matcher((String)it.next());
            while(m.find())
                System.out.println(it.nextIndex() + ": " +
                    m.group() + ": " + m.start());
        }
    }
} ///:~
The file is opened as a TextFile object (these were introduced earlier in this chapter). Since a TextFile contains the lines of the file in an ArrayList, from that array a ListIterator is produced. The result is an iterator that will allow you to move through the lines of the file (forward and backward).
Each input line is used to produce a Matcher, and the result is scanned with find( ). Note that the ListIterator.nextIndex( ) keeps track of the line numbers.
The test arguments open the JGrep.java file to read as input, and search for words starting with [Ssct].
XII-M-8. Is StringTokenizer needed?▲
The new capabilities provided with regular expressions might prompt you to wonder whether the original StringTokenizer class is still necessary. Before JDK 1.4, the way to split a string into parts was to "tokenize" it with StringTokenizer. But now it's much easier and more succinct to do the same thing with regular expressions:
//: c12:ReplacingStringTokenizer.java
import java.util.regex.*;
import com.bruceeckel.simpletest.*;
import java.util.*;

public class ReplacingStringTokenizer {
    private static Test monitor = new Test();
    public static void main(String[] args) {
        String input = "But I'm not dead yet! I feel happy!";
        StringTokenizer stoke = new StringTokenizer(input);
        while(stoke.hasMoreElements())
            System.out.println(stoke.nextToken());
        System.out.println(Arrays.asList(input.split(" ")));
        monitor.expect(new String[] {
            "But",
            "I'm",
            "not",
            "dead",
            "yet!",
            "I",
            "feel",
            "happy!",
            "[But, I'm, not, dead, yet!, I, feel, happy!]"
        });
    }
} ///:~
With regular expressions, you can also split a string into parts using more complex patterns-something that's much more difficult with StringTokenizer. It seems safe to say that regular expressions replace any tokenizing classes in earlier versions of Java.
You can learn much more about regular expressions in Mastering Regular Expressions, 2d Edition, by Jeffrey E. F. Friedl (O'Reilly, 2002).
XII-N. Summary▲
The Java I/O stream library does satisfy the basic requirements: you can perform reading and writing with the console, a file, a block of memory, or even across the Internet. With inheritance, you can create new types of input and output objects. And you can even add a simple extensibility to the kinds of objects a stream will accept by redefining the toString( ) method that's automatically called when you pass an object to a method that's expecting a String (Java's limited "automatic type conversion").
There are questions left unanswered by the documentation and design of the I/O stream library. For example, it would have been nice if you could say that you want an exception thrown if you try to overwrite a file when opening it for output-some programming systems allow you to specify that you want to open an output file, but only if it doesn't already exist. In Java, it appears that you are supposed to use a File object to determine whether a file exists, because if you open it as a FileOutputStream or FileWriter, it will always get overwritten.
The I/O stream library brings up mixed feelings; it does much of the job and it's portable. But if you don't already understand the decorator pattern, the design is not intuitive, so there's extra overhead in learning and teaching it. It's also incomplete; for example, I shouldn't have to write utilities like TextFile, and there's no support for the kind of output formatting that virtually every other language's I/O package supports.
However, once you do understand the decorator pattern and begin using the library in situations that require its flexibility, you can begin to benefit from this design, at which point its cost in extra lines of code may not bother you as much.
If you do not find what you're looking for in this chapter (which has only been an introduction and is not meant to be comprehensive), you can find in-depth coverage in Java I/O, by Elliotte Rusty Harold (O'Reilly, 1999).
XII-O. Exercises▲
Solutions to selected exercises can be found in the electronic document The Thinking in Java Annotated Solution Guide, available for a small fee from www.BruceEckel.com.
- Open a text file so that you can read the file one line at a time. Read each line as a String and place that String object into a LinkedList. Print all of the lines in the LinkedList in reverse order.
- Modify Exercise 1 so that the name of the file you read is provided as a command-line argument.
- Modify Exercise 2 to also open a text file so you can write text into it. Write the lines in the ArrayList, along with line numbers (do not attempt to use the "LineNumber" classes), out to the file.
- Modify Exercise 2 to force all the lines in the ArrayList to uppercase and send the results to System.out.
- Modify Exercise 2 to take additional command-line arguments of words to find in the file. Print all lines in which any of the words match.
- Modify DirList.java so that the FilenameFilter actually opens each file and accepts the file based on whether any of the trailing arguments on the command line exist in that file.
- Modify DirList.java to produce all the file names in the current directory and subdirectories that satisfy the given regular expression. Hint: use recursion to traverse the subdirectories.
- Create a class called SortedDirList with a constructor that takes file path information and builds a sorted directory list from the files at that path. Create two overloaded list( ) methods that will either produce the whole list or a subset of the list based on an argument. Add a size( ) method that takes a file name and produces the size of that file.
- Modify WordCount.java so that it produces an alphabetic sort instead, using the tool from Chapter 11.
- Modify WordCount.java so that it uses a class containing a String and a count value to store each different word, and a Set of these objects to maintain the list of words.
- Modify IOStreamDemo.java so that it uses LineNumberReader to keep track of the line count. Note that it's much easier to just keep track programmatically.
- Starting with section 4 of IOStreamDemo.java, write a program that compares the performance of writing to a file when using buffered and unbuffered I/O.
- Modify section 5 of IOStreamDemo.java to eliminate the spaces in the line produced by the first call to in5.readUTF( ).
- Repair the program CADState.java as described in the text.
- In Blips.java, copy the file and rename it to BlipCheck.java and rename the class Blip2 to BlipCheck (making it public and removing the public scope from the class Blips in the process). Remove the //! marks in the file and execute the program including the offending lines. Next, comment out the default constructor for BlipCheck. Run it and explain why it works. Note that after compiling, you must execute the program with "java Blips" because the main( ) method is still in class Blips.
- In Blip3.java, comment out the two lines after the phrases "You must do this:" and run the program. Explain the result and why it differs from when the two lines are in the program.
- (Intermediate) In Chapter 8, locate the GreenhouseController.java example, which consists of four files. GreenhouseController contains a hard-coded set of events. Change the program so that it reads the events and their relative times from a text file. (Challenging: use a design patterns factory method to build the events-see Thinking in Patterns (with Java) at www.BruceEckel.com.)
- Create and test a utility method to print the contents of a CharBuffer up to the point where the characters are no longer printable.
- Experiment with changing the ByteBuffer.allocate( ) statements in the examples in this chapter to ByteBuffer.allocateDirect( ). Demonstrate performance differences, but also notice whether the startup time of the programs noticeably changes.
- For the phrase "Java now has regular expressions" evaluate whether the following expressions will find a match:
^Java
\Breg.*
n.w\s+h(a|i)s
s?
s*
s+
s{4}
s{1.}
s{0,3}- Apply the regular expression
(?i)((^[aeiou])|(\s+[aeiou]))\w+?[aeiou]\bto
"Arline ate eight apples and one orange while Anita hadn't any"- Modify JGrep.java to accept flags as arguments (e.g., Pattern.CASE_INSENSITIVE, Pattern.MULTILINE).
- Modify JGrep.java to use Java nio memory-mapped files.
- Modify JGrep.java to accept a directory name or a file name as argument (if a directory is provided, search should include all files in the directory). Hint: you can generate a list of filenames with:
String[] filenames = new File(".").list();